First steps in FHEM
| An dieser Seite wird momentan noch gearbeitet. |
Hier entsteht die englische Fassung von Erste Schritte in FHEM...
- Letzte Änderung der dt. Fassung: 17.05.2020
- Letzte Änderung der engl. Fassung: 25.12.2017
- Neuere Version ist: dt. Version
This a beginners course for those starting to work with FHEM. After you have installed FHEM on your server you may reproduce all steps without any additional smart home hardware.
This guide was originally published by Ulrich Maass, who gave his permission to publish it in the FHEM wiki.
Note to editors: Everybody is welcome to improve typo, grammar and style. Content changes and extentions should be discussed with the author (e. g. on associated discussion page).
First attempt
To start FHEM for the first time, enter in your browsers address field:
http://<ip-address>:8083
e. g. http://192.168.1.1:8083.
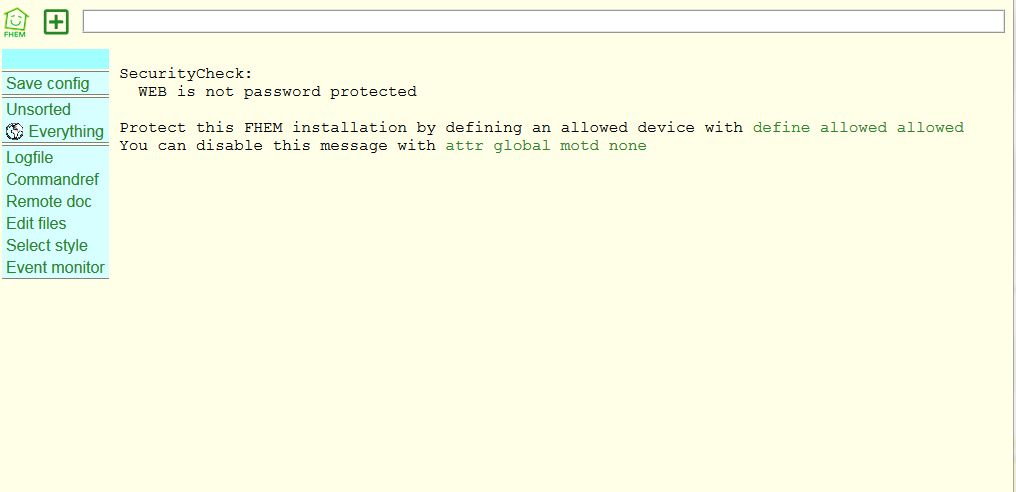
The FHEM homepage is displayed:
- At the top of the screen you can see the white command line where you can enter commands.
- The first menu item is the Save config button, which saves changes so that they are still available even after a restart.
- Furthermore, there are already the rooms Unsorted and Everything that we will soon get to know
- In the lower block there are further links, which we will also discuss later.
The Security Check note indicates that you have not yet set a password for FHEM. To set up password protection, see the FHEM command reference commandref, which contains a description of all FHEM functions and modules. To suppress this message for now, enter the following in the command line:
attr global motd none
and confirm this change with Enter.
Creating device - define
The basic element of FHEM is called device.Typical devices are, for example, remote controlled outlets, roller shutter motors, temperature sensors, solenoid valves etc.
But other things that at first glance wouldn't appear to be a physical device are devices: for example, the user interface of FHEM itself is a device ("FHEMWEB"), and there are devices without physical equipment that can be used to store a variable.
We will now create a very simple device, called dummy.
A dummy device is a special object in that it does not necessarily require a corresponding physical device (physical lamp, roller shutter, solenoid valve). In this way, you can carry out these steps without any hardware, and you can go through this general introduction without having to deal with the differences between the various hardware systems. A dummy device typically looks exactly the same in the FHEM interface as a FHEM device corresponding to a physical device in your hardware environment.
First, we'll create a switch. This simulates a light switch in the wall. To do this, enter the following command in the command field:
define mySwitch1 dummy
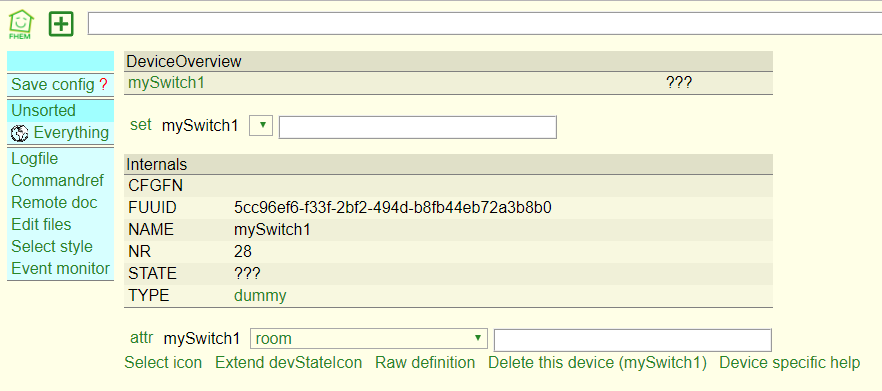
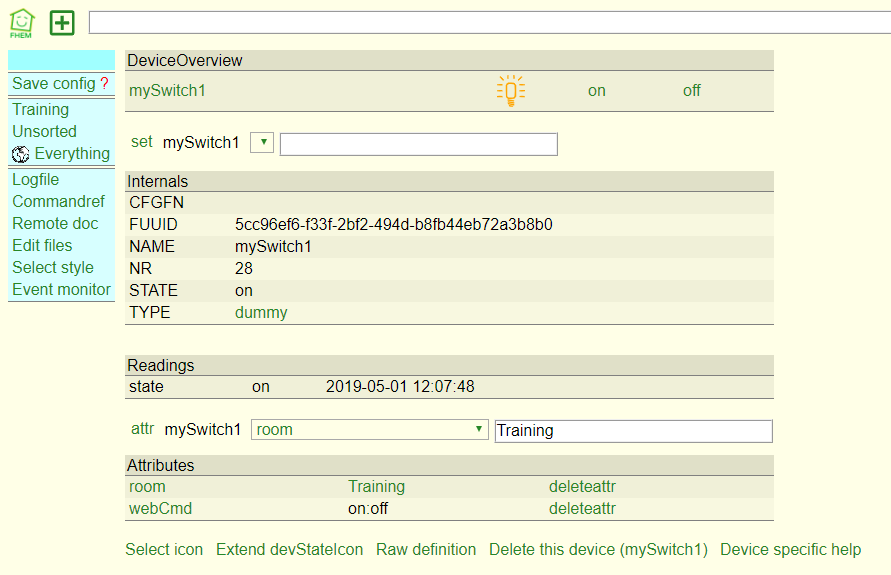
"define" is the needed FHEM command, "mySwitch1" the future name of our device, "dummy" describes its type. The words "define" and "dummy" are part of FHEM'S command syntax and cannot be modified, "mySwitch1" is (more or less) arbitrary. After pressing Enter the detailed view of our new FHEM device mySwitch1 is displayed.
Devices have a "state" that changes over time and that FHEM records. For example, a window is opened, a roller shutter curtain is closed and a radio socket is alive. A state does not have to contain exactly one variable (window either "open" or "closed"), a state can also be described by several variables (the state of a raspberry system, device-type sysmon, includes for example the CPU frequency, the CPU temperature, the workload and much more).
The device status in FHEM consists of three blocks of values, called Internals, Attributes and Readings. It would be too early to go into the meaning of the three terms in detail, but the following remarks are important for the following steps:
- Internals store very basic information about a device. They are rarely edited directly by the user (usually only during device setup).
- Attributs control device behavior. Typically they can be changed (or even defined) by users.
- Readings have, in contrast to the values of the other two blocks, a timestamp. Usually they are measured values of your device.
It may be confusing for beginners that there could be Internals and Readings with the same names (e.g. STATE and state). However, Perl is case sensitive!
- NAME: device name assigned by the user
- TYPE: device type of FHEM device, here: dummy
- STATE: device state shown in all summaries. Since there was no assignment till now it is initially ???.
Creating rooms
Let's do a step forward and arrange our devices in rooms. You may consider reasonable to put together devices physically (really) located in one room into a FHEM room. So you can find in "bedroom" appropriate devices like "shutter", "time switch" and "radio set". You may decide other assignments: put all measuring devices like thermometers, electric meters and hygrometers in one (possibly only virtually and not physically existing) room "measuring devices". Name of a room is arbitrary.
To achieve this you have to add to all devices your room should contain an "Attribute" (see above). Name of the attribute is "room" and it should get as its value the room name. Let's try it with our room dummy. Use command
attr mySwitch1 room Training
and finish input with Enter).
With this command you have added to device mySwitch1 Attribute room with value Training. Again, attr, mySwitch1 (while referencing to an existing object's name) and room are part of FHEM's command syntax and are unalterable, Training is arbitrary.
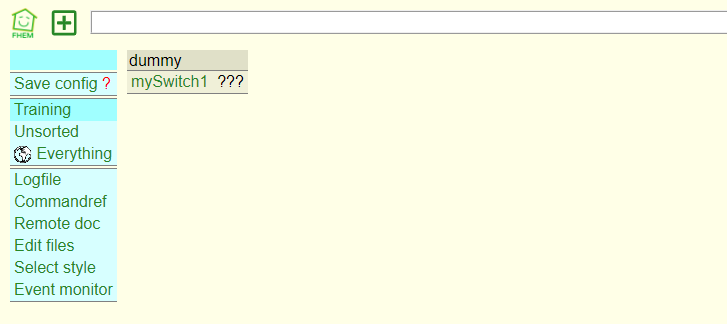
Now mySwitch1 belongs to room Training. Due to this assignment room appears in navigation bar on the left hand side in room's block. Try to click at room Training.
FHEM will show all devices belonging to this room. Until now we have only one device: mySwitch1 - our dummy.
Beside device name always device status is on display, we still get ???. Clicking at name mySwitch1 you will return to its detailed view.
Our dummy is shown in a block with (type) label dummy. You may change label as well introducing a further attribute "group" and assigning to it (arbitrary as well) name: groups order devices inside a room.
Note:
If you want to delete a room, you may do so removing all devices from this room. In our example of room Training you have to delete in all devices of room Training attribute room. Room Training will dispear by itself.
Creating switching commands
Now we want to add on/off-buttons to "mySwitch1":
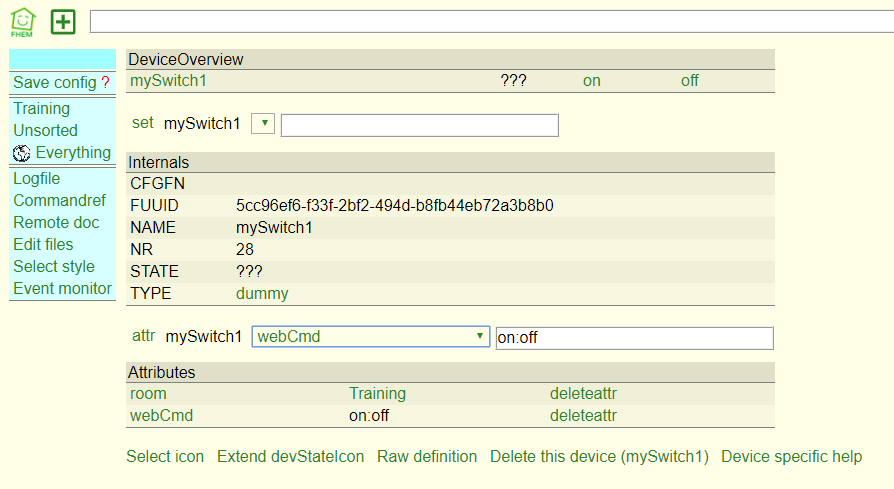
attr mySwitch1 webCmd on:off
Again we use an attribute named webCmd with values on:off, we want to add to device "mySwitch1". Instead of entering mentioned above command into command line field you may choose desired attribute (in this case: webCmd) in lower part of detail view and enter needed values into text field right next, in this case on:off. Complete your input with a click on button attr.
Now let's click again on room Training.
You may see, that due to atribute added in last step in room view switch buttons for on and off have appeared.
Click experimentally on on and off: instead of ??? you got so far you may find a bulb symbol showing current state.
Clicking on device name mySwitch1 you change back to detail view and may see in block Internals current state STATE - being shown in room view as an icon (bulb).
In detail view you can see a new block Readings as well.
Please switch off mySwitch1 once again. Pay attention to readings: next to internal STATE you may find a reading of same name (see above: Perl distinguishes lower and upper case), but equipped with a timestamp. Check reading state for updating at value and timestamp.
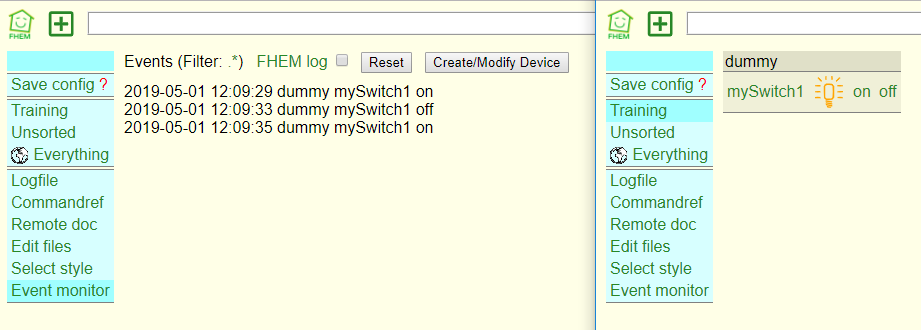
Event monitor
Please, open in your browser another window with FHEM and in FHEM its Event monitor. The shortest way is to right-click on Event monitor and to select from the local menu "Open in new window". Place Windows in such a way, that you can follow event monitor and operate your "mySwitch1" at once. Using Windows 7 or newer simply activate one window and press Windows+Pfeil rechts, followed by activating second window and pressing Windows+Pfeil links.
Devices communicate via events. One device sends an event to FHEM and FHEM distributes this event to all devices. Devices decide whether to react or not and if yes - how. Let's have a closer look at this.
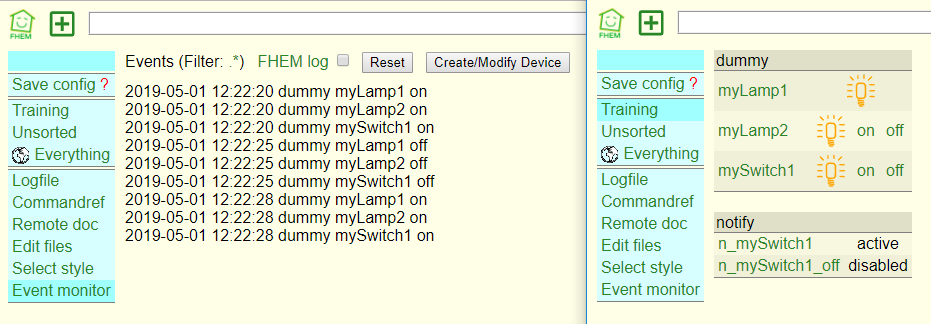
Switching mySwitch1 FHEM generates an event. With every actuation of the switch yet another event appears in Event monitor. Please look what happens when you consecutively click twice on on.
Events always consist of a timestamp followed by the type of the triggering device (in this case: dummy), name of the triggering device (in this case: mySwitch1) as well as triggered command (in this case: on or off).
FHEM devices like remotes or remote-controlled wall switches, which trigger physical events, generate events in FHEM with every keypress in device itself or click on associated FHEM device.
Understanding events, their structure and operation is crucial - we will frequently need them below.
Operating devices - set
So you have learned to switch mySwitch1 clicking at on or off. Alternatively you can use command line entering instructions there.
So please, enter in command line field set mySwitch1 on or set mySwitch1 off and confirm this with button Enter. Switching status will change accordingly as well and an Event will be triggered. By the way, we will frequently use command set in future.
Preparing further tests we now create a new device myLamp1 that we later on want to control with mySwitch1.
define myLamp1 dummy
Since myLamp1 is a lamp - an actor - it won't get buttons for on or off.
Lamp should be located in room Training. You might set this assignment via command line, like shown above. But this time we will use computer mouse...
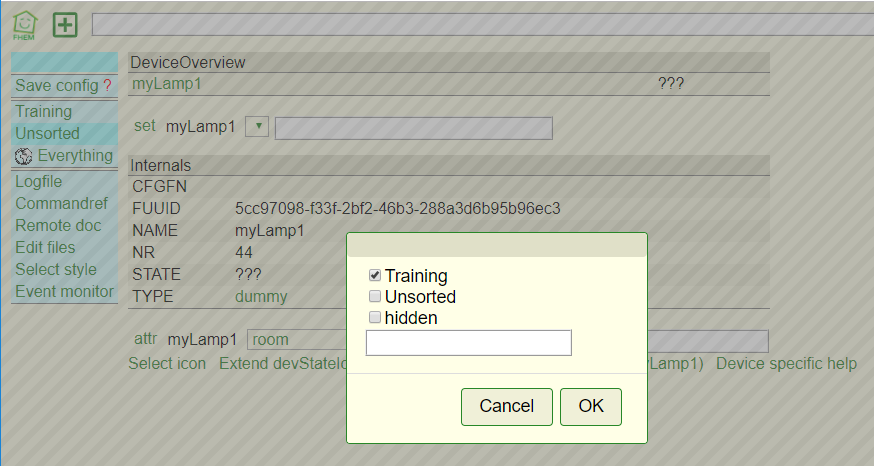
Until now myLamp1 has no room assignment, so it appears in room Unsorted. Change over in this room and click at name myLamp1 getting so detail view.
In the lower part we can set attribute assignments.
Attribute room is already selected (as default). When you click at text field next to room, a dialog box opens that contains all rooms FHEM knows so far. You may select one ore more checkboxes and assign this or these rooms to device. Now select only room Training and confirm selection with button OK. Selected room will be transferred into text field and it remains only to click at button attr to activate assingment.
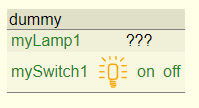
Now change back to room Training and you will see both devices:
Event trigger - notify
Now we will enable FHEM to react to an event of mySwitch1: Every time mySwitch1 is triggering event with command on we want to switch on myLamp1.
For it FHEM uses a "notify". Defining syntax looks like
define <NAME> notify <REGEXP> <command>
- Name <NAME> will help us to find this FHEM device and display its properties. This time we name the device n_mySwitch1_on - n_ for marking es a notify, following by the name of triggering device and triggering command. Such a name may seem too complicated but it is very useful when working with a whole bunch ov notifies. You may name it if desired n1 or John Doe. Device names may consist of characters a-z, A-Z, 0-9, _ (underscore) and . (period) with a period not at first position. In perl and therefore in FHEM period has a special meaning, so avoid if possible periods in device names.
- <REGEXP> stands for "regular expression" and describes a condition for raising notify. We will meet regular expressions in perl and FHEM frequently. They are used to describe syntactical characteristics of strings, e. g. whether a string contains a given word or not, whether digits are in our string and much more. When ever in FHEM a event raises for every notify runs a check for regexp matching. In our case mySwitch1 raises an event with command on. To "catch" this event and react to it we have notation
mySwitch1:on. In future you will have much more moments to deal with regexps in detail. :) - <command> tells what to do. In our case:
set myLamp1 on.
So our notify looks like
define n_mySwitch1_on notify mySwitch1:on set myLamp1 on
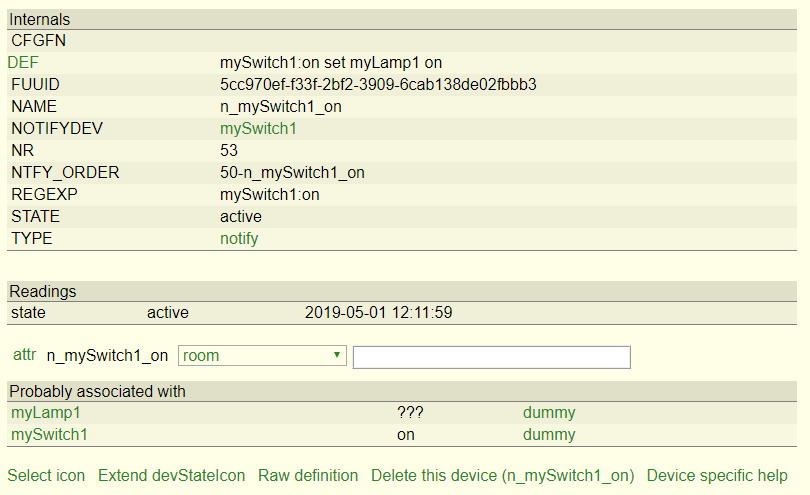
After you have entered this in command field followed by Enter, you will see again detail view of the new FHEM notify device (see TYPE).
In block Internals you can find definition DEF. Here you see all text you have entered in event definition after the word "notify" (device type). So you can see <regexp> and <command>.
Please assign notify to room Training (find in the lower part attribute room and choose correct room followed by a click at attr).
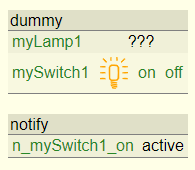
So clicking in FHEM's main menu at Training you will get our three FHEM devices.
Now switch mySwitch1 to on - myLamp1 will be switched too. It seems that it works only at first time, but checking event monitor or looking in myLamp1's detail view at timestamp of last state change you can notice that it executes every time.
To get it working for switching off too we define a second notify:
define n_mySwitch1_off notify mySwitch1:off set myLamp1 off
Does it work like expected?
Doubtless you dislike defining an own notify for every command a device should raise. You can get it easier.
Instead of
define n_mySwitch1_on  notify mySwitch1:on  set myLamp1 on
define n_mySwitch1_off notify mySwitch1:off set myLamp1 off
we define
define n_mySwitch1 notify mySwitch1 set myLamp1 $EVENT
We see that this time regexp doesn't differ events on and off of mySwitch1. With an absent regexp declaration notify raises for any event with whatsoever command. In executing set command we use FHEM variable $EVENT (follow the capital notation!). This is a placeholder for the command taken over from the raising event. Having from mySwitch1 an on, $EVENT will stand for value on too, accordingly for off and any other command.
Deleting or disabling devices – delete, disable
Looking at Event Monitor you see that after activation of mySwitch1 command for myLamp1 is executed twice. The reason is, that any event of mySwitch1 is catched by two notifies - by the "old" notify as well as by the new one. To avoid this we should get rid of the old. For that purpose we have two choices.
- Delete a notify with command
delete <name>, e. g. withdelete n_mySwitch1_on. By the way, commanddeleteworks with any object in FHEM. So you can delete this way "real" devices too. - Deactivate a notify, using attribute disable. You can assign it in detail view of the related notify (find attribute disable in lower part and choose value 1 with a following click at attr), or enter in command line:
attr n_mySwitch1_off disable 1.
Save Config
Whenever you are satisfied with the current state of your FHEM configuration, click on Save config in the top left corner of the FHEM menu or enter the command save in the command field followed by Enter. Your configuration is now saved. If you do not do this, all changes will be lost after the next FHEM restart. FHEM therefore reminds you of unsaved changes with a red question mark next to Save config.
Modifying existing devices – modify
We now create a second lamp, which should also be switched by our mySwitch1 and our Notify. The new lamp is created by entering the following in the command field:
define myLamp2 dummy
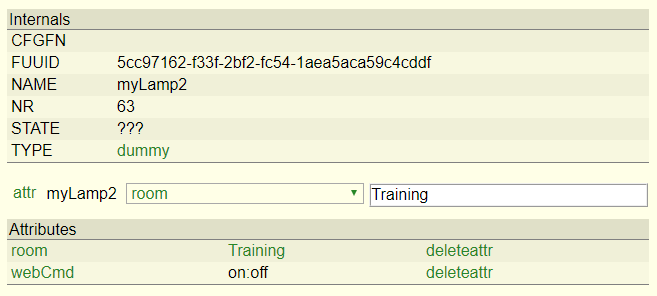
With several clicks in the detail screen of myLamp2 you can also assign them to the room Training and assign buttons for on and off via the webCmd attribute.
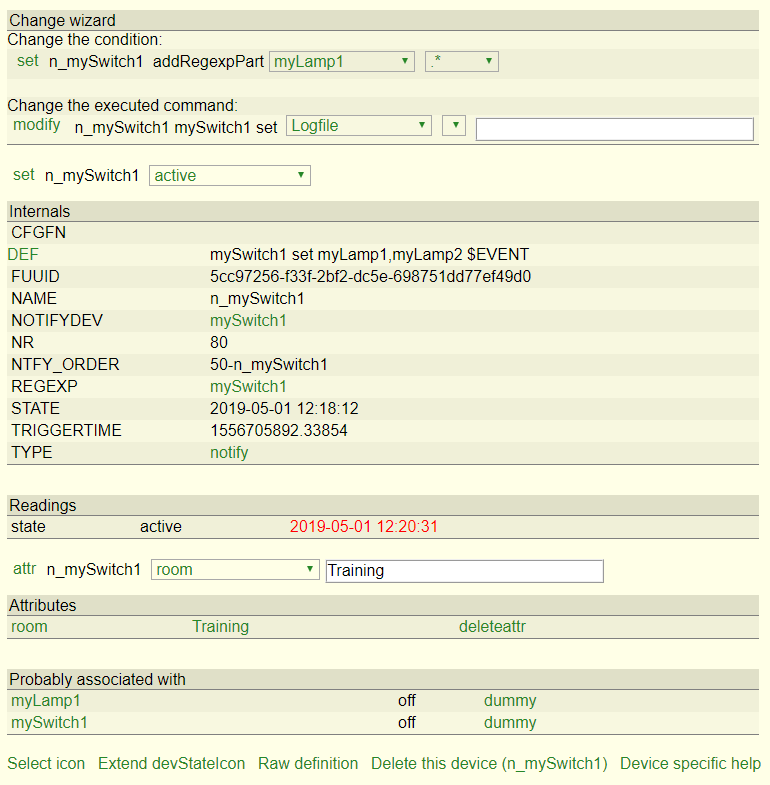
Now we adjust the Notify n_mySwitch1. To do this, navigate to the Notify detail screen: Switch to the Training room and click on the name of n_mySwitch1.
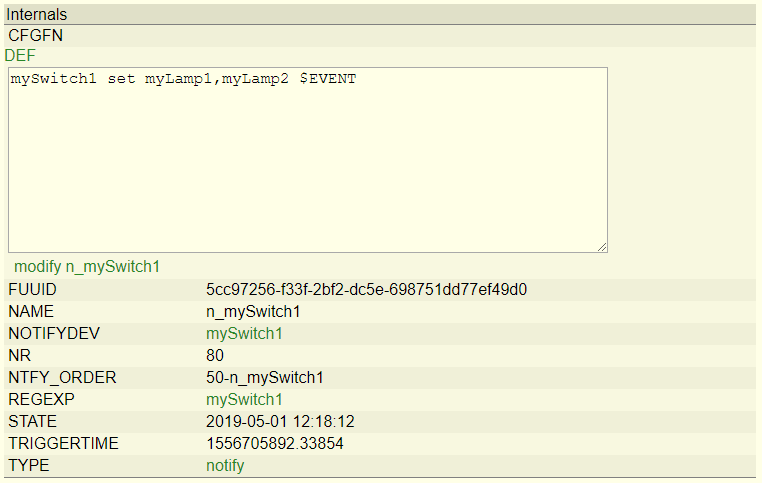
In the detail screen there is the line DEF, which we have already looked at before. If you click on the word DEF, you can edit the definition of an FHEM object.
We change here from
define n_mySwitch1 notify mySwitch1 set myLamp1 $EVENT
to
define n_mySwitch1 notify mySwitch1 set myLamp1,myLamp2 $EVENT
To finish editing click on the 'modify <name>' button, i. e. modify n_mySwitch1. If you check the details in the detail screen, you will see that the DEFinition of the notify has been adjusted.
Note again that in the detail screen below under Probably associated with the switched lamps will appear in the lower section of the detail screen - this will often be useful.
Now you can test whether a click on mySwitch1 really switches both lamps. Take a look at the events in a separate window with the Event Monitor.
Switching a couple of devices at once
For switching several devices can therefore be used
set <device1>,<device2> on
An alternative spelling for it is
set <device1> on; set <device2> on
Also a combination is possible:
set <device1>,<device2> on; set <device3> off
Even within a notify (or other FHEM commands) you can list several commands, but here is one to note:
define n1 notify mySwitch1:on set myLamp1 on;set myLamp2 off
The commands are separated by a semicolon. Effect is: The notify switches myLamp1 whenever mySwitch1 sends the event on. The next command in this line is set myLamp2 off. This is processed immediately when the above-mentioned command line is entered. It switches myLamp2 immediately, myLamp1 only after the mySwitch1 event.
If the second command set myLamp2 off should also be executed after the event, a double semicolon must be used:
define n1 notify mySwitch1:on set myLamp1 on;;set myLamp2 off
The combined variant could look like this:
define n1 notify mySwitch1:on set myLamp1 on;;set myLamp2 off;set myLampe3 on
This command line would switch myLamp3 immediately, but only after the mySwitch1 event myLamp1 and myLamp2 switch.
Renaming devices
Finally we want to rename (for the exercise) another device: myLamp2 should be myStandardLamp. For this we use
rename <oldName> <newName>
It should be noted that related notify statements are not updated automatically. So, before renaming, note the Probably associated with list at the bottom of the detail screen so that you do not forget any of your Notify during the following adjustment.
So enter in the command box
rename myLamp2 myStandardLamp
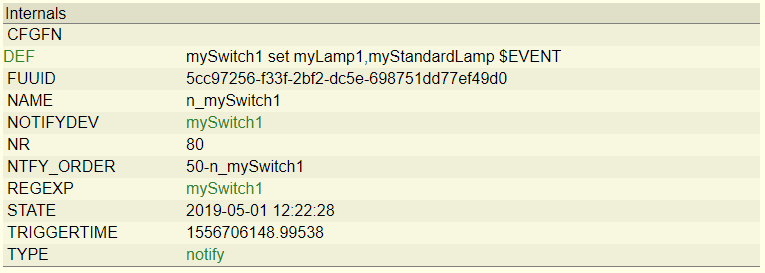
and then adjust n_mySwitch1 by customizing the definition on its detail screen in the 'DEF' section.
After the change, the Notify must be
define n_mySwitch1 notify mySwitch1 set myLamp1,myStandardLamp $EVENT
Scheduler - at
The next step is to set up a time control. First of all, we want to ensure that myLamp1 is switched off after one minute, such as a staircase light.
The FHEM device type at is available for time control. The command structure is
define <name> at <timespec> <command>
<name> and <command> have the same function here as with notify. New here is only <timespec> (time specification), so the time specification. This is done in the notation HH:MM:SS or HH:MM.
To turn off myLamp1 so in one minute, create the following at:
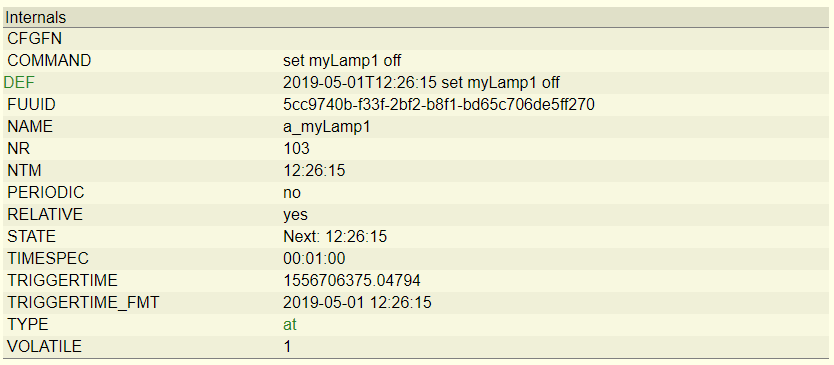
define a_myLamp1 at +00:01:00 set myLamp1 off
Try it. Will myLamp1 be turned off after one minute? Is an event generated during this process?
If you want to see the detail view of the at, you have to hurry up: After a single execution, the at is automatically deleted. If FHEM was faster, you can create it again and specify a longer period of time if necessary. :-)
With <timespec> you can omit the seconds and just write HH:MM. There are also several variants:
| notation | explanation |
|---|---|
| +00:02:00 | In two minutes; single execution |
| 00:02:00 | At two minutes past midnight, ie at 00:02 and 0 seconds; one-time execution |
| *00:02:00 | Daily at 00:02 |
| +*00:02:00 | Every 2 minutes |
| +*{3}00:02 | Three times, every two minutes |
| *{3}00:02 | Three times at 00:02 |
| *{sunset_rel()} | Daily at sunset |
| *{sunrise(+120)} | 2 minutes (120 seconds) daily after sunrise |
- By specifying * a permanent repetition is defined. The repetitions continue until the at is deleted or disabled.
- By specifying + the specified time is no longer interpreted as an absolute time, but as a timer, after how many hours:minutes:seconds the command is executed.
- By specifying {n} the at will only be run n times.
- The functions {sunset_rel()} and {sunrise()} return the appropriate time. This is repeated daily by specifying *. The curly braces indicate that FHEM directly executes the contents of these braces as perl functions.
For example, to switch off the garden lighting every day at sunrise, define something like
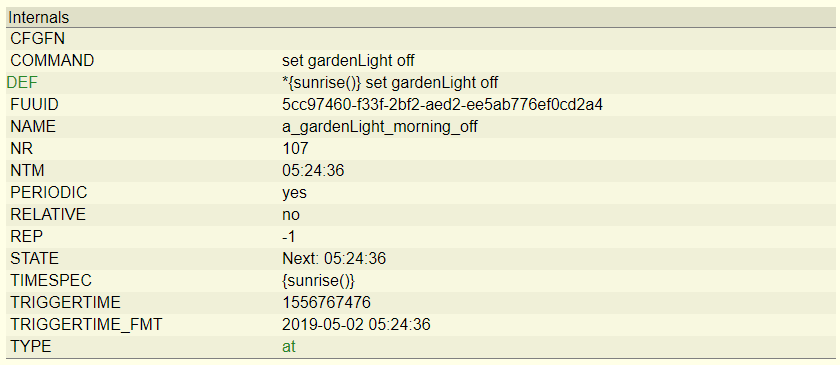
define a_gardenLight_morning_off at *{sunrise()} set gardenLight off
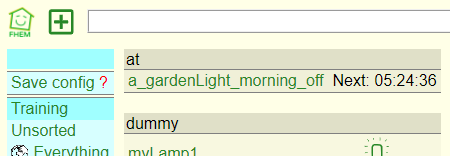
In the detail screen of an at the time of the next execution is displayed in the STATE.
This info also appears in the room view if you show the at there:
Event-driven timer start - notify und at
As a last exercise we want to combine a notify and an at. The timer should now not start when you enter the command in the command field, but when an event occurs.
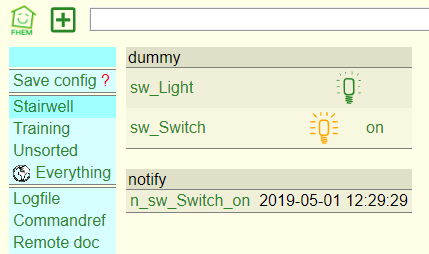
To do this we create a Stairwell: create the Dummy-Devices sw_Switch and sw_Light in the room Stairwell. To create the Stairwell room assign the room to the first device via the command field, then click on all other attributes in the detail screen:
define sw_Switch dummy
attr   sw_Switch room Stairwell
attr   sw_Switch webCmd on
define sw_Light dummy
attr   sw_Light room Stairwell
Now the Notify is missing, which reacts to sw_Switch:on and executes two commands:
- Switching on the staircase light with
set sw_Light on - Start a timer that switches it off after one minute. So
define a1 at +00:01 set sw_Light off.
This will look like this (and must be entered in the command field as a single line):
define n_sw_Switch_on notify sw_Switch:on
       set sw_Light on;;define a1 at +00:01 set sw_Light off
When the Notify is triggered, the staircase lighting is switched on as a command, as well as the definition of a timer that switches it off a minute later. Is it working?
Since this is quite bulky, there is a slightly simpler alternative:
define n_sw_Switch_on notify sw_Switch:on set sw_Light on;;sleep 60;;set sw_Light off
Some hardware systems also offer the command on-for-timer, which can be used to write alternatively
define n_sw_Switch_on notify sw_Switch:on set sw_Light on-for-timer 60
What's next?
You have now been introduced:
- Creating FHEM devices with define
- Events and the Event Monitor
- Switching Devices with set
- Modifying Devices with modify, rename and delete
- Setting and editing Attributs
- Event driven actions by notify
- Time-controlled switching with at
So you know the most basic mechanisms of FHEM. Details of these commands can be found in the FHEM command reference commandref
In the commandref you will find the description of all FHEM commands as well as the list of all device types that can be integrated in FHEM.
You will find that "real" FHEM devices look exactly like the dummy devices you have already seen here. The main difference is that you no longer have to define the available commands yourself using attr webCmd, since they are already predefined by the FHEM device. And events are triggered not only when you click on the FHEM web frontend, but also when the physical device (i. e. the motion sensor or the light switch on the wall) is triggered.
Once you have paired your first devices with FHEM, look at the event monitor to see when which events will be triggered.
A more comprehensive introduction to FHEM can be found in the document Heimautomatisierung-mit-FHEM (german)
The basics of the programming language Perl, which are important for FHEM, can be read in the first chapters of a Perl book or in various free online tutorials.
Have fun and success with FHEM!
