Quick-Start/en: Unterschied zwischen den Versionen
Drhirn (Diskussion | Beiträge) K (veraltete "source"-Angaben in "syntaxhighlight" geändert) |
|||
| (30 dazwischenliegende Versionen von 7 Benutzern werden nicht angezeigt) | |||
| Zeile 4: | Zeile 4: | ||
First step is to install FHEM on your server (dedicated hardware or virtual machine). We provide instructions for different operating systems [https://fhem.de/#Installation here]. | First step is to install FHEM on your server (dedicated hardware or virtual machine). We provide instructions for different operating systems [https://fhem.de/#Installation here]. | ||
Having started FHEM the first time, please have a look at the FHEM logfile<ref>In most cases you find the log in <code>/opt/fhem/log</code></ref><ref>Most installations use Linux as operating system for the server. So if not stated differently, the commands and examples provided here use the syntax for Linux</ref>. The log file will look something like the following example: | Having started FHEM the first time, please have a look at the FHEM logfile<ref>In most cases you'll find the log in <code>/opt/fhem/log</code></ref><ref>Most installations use Linux as operating system for the server. So if not stated differently, the commands and examples provided here use the syntax for Linux</ref>. The log file will look something like the following example: | ||
< | <syntaxhighlight lang="text"> | ||
2018.03.09 09:17:51 1: Including fhem.cfg | 2018.03.09 09:17:51 1: Including fhem.cfg | ||
2018.03.09 09:17:51 3: telnetPort: port 7072 opened | 2018.03.09 09:17:51 3: telnetPort: port 7072 opened | ||
| Zeile 18: | Zeile 18: | ||
2018.03.09 09:17:51 0: Featurelevel: 5.8 | 2018.03.09 09:17:51 0: Featurelevel: 5.8 | ||
2018.03.09 09:17:51 0: Server started with 9 defined entities (fhem.pl:16349/2018-03-07 perl:5.024001 os:linux user:fhem pid:9341) | 2018.03.09 09:17:51 0: Server started with 9 defined entities (fhem.pl:16349/2018-03-07 perl:5.024001 os:linux user:fhem pid:9341) | ||
</ | </syntaxhighlight> | ||
==Talking to FHEM== | ==Talking to FHEM== | ||
FHEM | After installation, FHEM can be accessed by a {{Link2CmdRef|Anker=FHEMWEB|Lang=en|Label=FHEMWEB}}interface to be found at the following URL: | ||
'''http://<fhem-server>:8083/fhem''' | |||
{{Hinweis|You may add more FHEMWEB devices. This may be helpfull in case you want to use a different style than default ''f18'' on smaller display sizes or provide pages with limited options to controll FHEM for other users. In case you need a lower level communication channel to FHEM, e.g. for scripting or emergancy cases, have a look at [[Telnet|telnet]].}} | |||
<gallery> | <gallery> | ||
datei:ErsteSchritteInFhem01.png|Desktop version of the FHEM start screen just after installation | datei:ErsteSchritteInFhem01.png|Desktop version of the FHEM start screen just after installation | ||
datei:erster_aufruf_smartphone.png|Smallscreen version of the start screen | datei:erster_aufruf_smartphone.png|Smallscreen version of the start screen | ||
Datei:Erster_aufruf_telnet.png|A new telnet connection after issuing a ''version'' command | |||
</gallery> | </gallery> | ||
;Elements of the web interface: | ;Elements of the web interface: | ||
*The input box at the top is used to enter commands and here | *The input box at the top is used to enter commands and here referred to as "command field". Finish your typing with {{Taste|Enter}} to pass the commands to FHEM for processing. | ||
*The | *Left of the command field there's a symbol (+). Clicking will prompt a popup field to enter [[Import von Code Snippets|RAW-Code]] - a very effective way to enter multiple command lines in one step. | ||
*Below "Save config" is a section listing the "rooms" known by FHEM. At first start you will only find the rooms ''Unsorted'' and ''Everything''. New rooms will automatically appear if you assign the respective attribute<ref>Further informationen on the terminology used in a FHEM context is provided in our [[ | *The menu on the left starts with the item ''Save config''. FHEM allows to change its configuration at runtime. To make changes permanent and keep them available after restart of FHEM or the server hardware also, they have to be written to a configuration file<ref>In most cases this is a text file, but you may also use a database. See {{Link2CmdRef|Anker=configDB|Lang=en|Label=configDB}} for how to use a database as configuration source</ref>. If you see a red ''?'' beneath this menu item, this indicates unsaved changes of your configuration. | ||
*The - preliminary - last section of the | *Below "Save config" is a section listing the "rooms" known by FHEM. At first start you will only find the rooms ''Unsorted'' and ''Everything''. New rooms will automatically appear if you assign the respective attribute<ref>Further informationen on the terminology used in a FHEM context is provided in our [[:Kategorie:Glossary|glossary (german)]]</ref> to the devices<ref>Please note: The term "'''device'''" is often used used in the FHEM context in a special way. This could - but must not necessarily be - a physical piece of equipment. "Device" just is a term for any physical or virtual "object" that can be introduced in a FHEM system by a ''define'' or ''defmod'' command.</ref> you add later on. | ||
*The - preliminary - last section of the menu is built by some links you might find useful. | |||
==Securing the FHEM server component== | ==Securing the FHEM server component== | ||
As you have already seen, in a fresh installation you | As you have already seen, in a fresh installation you merely have to be in the same network segment to have full access to the FHEM server. There's no encryption nor authorization by user or password. This is why you get respective warnings at FHEM's starting page. | ||
FHEM may be secured using one of the following options: | FHEM may be secured using one of the following options: | ||
| Zeile 50: | Zeile 48: | ||
{{Randnotiz|RNTyp=b|RNText=For instructions on how to use FHEM commands and additional info just type <code>help <command></code> in the command field and press {{Taste|Enter}}.}} | {{Randnotiz|RNTyp=b|RNText=For instructions on how to use FHEM commands and additional info just type <code>help <command></code> in the command field and press {{Taste|Enter}}.}} | ||
It is recommended to define one or more ''allowed'' devices. For instructions on how to do this, please have a look | It is recommended to define one or more ''allowed'' devices. For instructions on how to do this, please have a look at our {{Link2CmdRef|Anker=allowed|Lang=en|Label=CommandRef}} or just pass <code>help allowed</code> to the command field. | ||
As long as there's no allowed device defined, FHEM restricts all interfaces access' to the local network. | As long as there's no allowed device defined, FHEM restricts all interfaces access' to the local network. | ||
{{Randnotiz|RNTyp=b|RNText=The notation <code><command> <parameter></code> is not only used here, but is also very common in other documents and examples you'll find when using FHEM. In these cases you are asked to replace the placeholder in the brackets (including the "<>"-brackets) by your own meaningful content.}} | {{Randnotiz|RNTyp=b|RNText=The notation <code><command> <parameter></code> is not only used here, but is also very common in other documents and examples you'll find when using FHEM. In these cases you are asked to replace the placeholder in the brackets (including the "<>"-brackets) by your own meaningful content.}} | ||
Additionally you may add for your FHEMWEB device, | Additionally you may add for your FHEMWEB device, whose sole purpose is to serve you FHEM via browser, a {{Link2CmdRef|Anker=HTTPS|Lang=en|Label=HTTPS}} attribute to activate HTTPS for http connections. For telnet (being also to some extent also a TCP/IP port) please use the {{Link2CmdRef|Anker=SSL|Lang=en|Label=SSL}} attribute. | ||
By default, none of these securing methods is activated. If you are securing your server and FHEM by other methods you may switch | By default, none of these securing methods is activated. If you are securing your server and FHEM by other methods you may switch off the respective warning using the global attribute {{Link2CmdRef|Anker=motd|Lang=en|Label=motd}}. | ||
===FHEM and the WWW=== | ===FHEM and the WWW=== | ||
If you | If you intend to have access to FHEM not only from your local net it is highly recommended to take additional measures. Common options are to use a VPN (Virtual Private Network) and/or a reverse proxy server like [[Apache_Authentication_Proxy|Apache]] or [[HTTPS-Absicherung_%26_Authentifizierung_via_nginx_Webserver|nginx]]. | ||
===Additional remarks on security=== | ===Additional remarks on security=== | ||
Please note: Running a server system requires regular updates | Please note: Running a server system requires regular updates to the operating system and other software components installed on it. Besides that, any other components you use for home automation will contribute to the level of (non-)security of the entire system you run in the end. | ||
==Interfaces to the real world== | ==Interfaces to the real world== | ||
{{Randnotiz|RNTyp=b|RNText=If | {{Randnotiz|RNTyp=b|RNText=If at this point you do not have any hardware to be included in your FHEM you may follow our [[First steps in FHEM|first steps in FHEM]] to get an impression how to configure devices in FHEM.}}To get information about what is happening in the real world, you have to somehow connect FHEM with it. | ||
Many FHEM installations use one or more USB devices (e.g. CUL, FHZ1x00, TCM, ZWave, ...) directly attached to the FHEM server for this task. To use this type of connection<ref>This also applies when devices are attached using serial interfaces provided at GPIO pins of single-board computers like the ''Raspberry Pi''.</ref> you need additional pieces of software, especially the Perl module ''serial''<ref>The Perl-''serial''-module can either be installed by issuing the <code>sudo cpan Device::SerialPort</code> command at OS level or by installing precompiled Debian packages (''libdevice-serialport-perl''). Beginning with Mac OS X 10.5 (Leopard) the module is also provided as package. If the perl module is not available for your operating system you may use the ''@directio''-option (see commandref for further information).</ref>. Have a look at the respective part of the commandref for details about the configuration of your USB device(s). The Perl module is not required if the device is connected via Ethernet (e.g. HM-LAN or CUNO). | |||
===Automatic Configuration=== | ===Automatic Configuration=== | ||
By default FHEM will try to identify commonly used USB | By default FHEM will try to identify commonly used USB devices like FHZ, CUL<ref>In a Linux environment, FHEM will also try to flash an attached CUL in case it's not yet programmed with firmware. For details see the descriptions of the commands <code>usb</code> and <code>CUL flash</code> in commandref.</ref>, COC, ZWave or TCM. These just have to be attached when FHEM is starting to have FHEM write the respective parts to its configuration file. When attaching devices to a running FHEM you have to issue a <code>shutdown restart</code> in the command field to start the auto configuration. | ||
Typically you'll have to | Typically you'll have to do additional configuration work also for automatically detected devices by assigning the appropriate values to attributes. You can easily get an overview of the available attributes and to some extent also a set of values for them by just clicking the name of the device shown in the respective room. New devices in most cases can be found in the room ''Unsorted''. | ||
Once you have basic definitions of all of your USB devices it's recommended to deactivate the automatic recognition of USB devices by entering | Once you have basic definitions of all of your USB devices it's recommended to deactivate the automatic recognition of USB devices by entering <code>attr initialUsbCheck disable 1</code> to the command field. | ||
===Manual Configuration=== | ===Manual Configuration=== | ||
{{Randnotiz|RNTyp=g|RNText=In commandref you'll find again a notation like <code>define <name> CUL <device> <FHTID></code>. Please replace the placeholders in the brackets with own content and also delete the brackets.}} | {{Randnotiz|RNTyp=g|RNText=In commandref you'll find again a notation like <code>define <name> CUL <device> <FHTID></code>. Please replace the placeholders in the brackets with own content and also delete the brackets.}} | ||
USB devices can easily also be configured manualy, especially in cases they are not automatically detected as described above. After plugging them in, just look where these are located in your file system - typically somewhere in the directory <code>/dev</code>. E.g. a CUL will be found as a file ''/dev/ttyACM*'' in a Linux environment. Mac OS X will label the same device as ''/dev/cu.usbmodem*''. Use this description (entire path and file name) | USB devices can easily also be configured manualy, especially in cases they are not automatically detected as described above. After plugging them in, just look where these are located in your file system - typically somewhere in the directory <code>/dev</code>. E.g. a CUL will be found as a file ''/dev/ttyACM*'' in a Linux environment. Mac OS X will label the same device as ''/dev/cu.usbmodem*''. Use this description (entire path and file name) to enter the define command directly in the command field. | ||
Examples: | Examples: | ||
*A CUL | *A CUL stick can be defined like this: <code>define CUL1 CUL /dev/ttyACM0@9600 1234</code><ref>Please note: the number "1234" is just an example; replace this by your own parameter</ref> | ||
*Z-Wave | *Z-Wave controller: <code>define ZWDongle ZWDongle /dev/serial/by-id/usb-0658_0200-if00@115200</code><ref>This type of representation of the USB device in the Linux file system can also be used. To get the information in that form, you just type <code>ls -l /dev/serial/by-id</code> at operating system level</ref> | ||
Please consult the {{Link2CmdRef|Lang=en|Label=commandref}} for further information on configuration of a specific device. | Please consult the {{Link2CmdRef|Lang=en|Label=commandref}} for further information on configuration of a specific device. | ||
| Zeile 89: | Zeile 87: | ||
===autocreate=== | ===autocreate=== | ||
By default, FHEM is also configured to automatically add to your configuration all | By default, FHEM is also configured to automatically add to your configuration all kinds of devices it detects when running. This especially happens when you use RF equipment. FHEM will use its ''autocreate'' function as soon as the respective device sends data over the air. | ||
So if you want to include sensors like S300 or FHT, all you have to do is to attach an appropriate USB | So if you want to include sensors like S300 or FHT, all you have to do is to attach an appropriate USB device for reception of messages sent by your devices and wait, look out for changes in the logfile and refresh the FHEM webpage in your browser. The naming of newly detected devices is oriented on their technical parameters. | ||
===Rename=== | ===Rename=== | ||
| Zeile 101: | Zeile 99: | ||
If you want to manually add a device or have to do so because autocreate won't work, you have to follow these steps: | If you want to manually add a device or have to do so because autocreate won't work, you have to follow these steps: | ||
Wait until the device sends some data. In the FHEM logfile (available via the | Wait until the device sends some data. In the FHEM logfile (available via the menu at "Unsorted -> FileLog -> Logfile -> text") you may see e.g. the following line: | ||
FS20 Unknown device <HOUSECODE>, Button <BTN> Code <CDE>, please define it | FS20 Unknown device <HOUSECODE>, Button <BTN> Code <CDE>, please define it | ||
| Zeile 114: | Zeile 112: | ||
Once you did that, the other attributes you may set are restricted to the ones that really apply to the chosen model. | Once you did that, the other attributes you may set are restricted to the ones that really apply to the chosen model. | ||
Also for other RF | Also for other RF types of hardware devices not automatically recognized there should appear a similar line in the logfile. | ||
The exact procedure to include other | The exact procedure to include other types of RF equipment typically varies. | ||
E.g. HomeMatic devices not necessarily need to be under full control of FHEM (paired). To be included by autocreate a HomeMatic device has to send a pairing request, and FHEM has to enter a special mode to accept this request. Enter <code>set CUL hmPairForSec 600</code> in the command | E.g. HomeMatic devices do not necessarily need to be under full control of FHEM (paired). To be included by autocreate, a HomeMatic device has to send a pairing request, and FHEM has to enter a special mode to accept this request. Enter <code>set CUL hmPairForSec 600</code> in the command field to make the latter happen and see the manual of the device how to do it on that end. ZWave devices require a similar procedure with slightly different commands. | ||
===Including Devices by Sending Configuration Commands=== | ===Including Devices by Sending Configuration Commands=== | ||
Some | Some types of devices require special RF commands to configure them for usage with a central unit like FHEM or to link them directly with other devices (e.g. a PIR message used directly by a switch). To include that type of hardware, you have to first manually configure FHEM to prepare it to send out these so called learning messages. | ||
E.g. a FS20 device can be defined like this: | E.g. a FS20 device can be defined like this: | ||
| Zeile 127: | Zeile 125: | ||
define lamp1 FS20 1234 56 | define lamp1 FS20 1234 56 | ||
Prepare the device by pressing | Prepare the device by pressing its physical registration button until the LED starts blinking. Then you click on the link in the device's FHEM web page to send out the learning command. The LED should stop blinking to indicate that it now is programmed to house code 1234 and device code 56. You may also use the 4-base ELV notation instead. Once this is sucessfully done, you may again set model specific attributes to limit the available options to ones relevant for this model, e.g.: | ||
attr lamp1 model fs20st | attr lamp1 model fs20st | ||
{{Randnotiz|RNTyp=b|RNText=Whenever there's a (FHT/HomeMatic/EnOcean or other) device visible in FHEM after automatic or manual inclusion this not necessarily means it also is fully integrated or "paired". It is highly recommended to check out first if there are still commands pending or options to be set and | {{Randnotiz|RNTyp=b|RNText=Whenever there's a (FHT/HomeMatic/EnOcean or other) device visible in FHEM after automatic or manual inclusion this not necessarily means it also is fully integrated or "paired". It is highly recommended to check out first if there are still commands pending or options to be set and sent to the device first!}}Other types of RF systems (EnOcean/HomeMatic/ZWave) also need specific and substantial procedures to be followed to get these devices under full control of FHEM. Please have a look at the corresponding section of the commandref and the manual of the device before starting these procedures. | ||
==Basics about | ==Basics about controlling your devices== | ||
Once your sensors and actors are correctly defined in FHEM you will be able to control any of your actors using FHEM's telnet or web interface. | Once your sensors and actors are correctly defined in FHEM you will be able to control any of your actors using FHEM's telnet or web interface. | ||
{{Randnotiz|RNTyp=b|RNText=If you start with FHEM and are able to read | {{Randnotiz|RNTyp=b|RNText=If you start with FHEM and are able to read German, it's recommended to read the [http://fhem.de/Heimautomatisierung-mit-fhem.pdf Einführung in die Automatisierung mit FHEM]. This document is - beside some details - still up to date. Although new features like the f18 style, modules like {{Link2CmdRef|Anker=allowed|Label=allowed}} or {{Link2CmdRef|Anker=DOIF|Label=DOIF}} are not covered there, and the selection of available hardware systems has continued to increase since its last update. Nevertheless, this introduction still offers a quite comprehensive overview of the general procedures and possibilities with FHEM. | ||
The module DOIF has only a short {{Link2CmdRef|Anker=DOIF|Label=English commandref}}. The complete commandref is provided by the module maintainer only in {{Link2CmdRef|Anker=DOIF|Lang=de|Label=German with several example codes}}. If you can't understand this or don't want to get used to DOIF for this reason: you can use the full functionality of FHEM without DOIF. Use for example {{Link2CmdRef|Anker=notify|Label=notify}}, {{Link2CmdRef|Anker=at|Label=at}} and the other modules instead.}} | |||
==Timer== | ===Timer=== | ||
The most basic way to implement timer functionality in FHEM is to define an "at". | The most basic way to implement timer functionality in FHEM is to define an "at". | ||
Examples and basic instructions you'll find in the {{Link2CmdRef|Lang=en|Anker=at|Label=commandref}}. | Examples and basic instructions you'll find in the {{Link2CmdRef|Lang=en|Anker=at|Label=commandref}}. | ||
==Reacting on events from the real world== | ===Reacting on events from the real world=== | ||
If you want FHEM to react to any message sent by one | If you want FHEM to react to any message sent by one or more sensors or other devices (an "event" in FHEM terminology), you use an [[event handler]]. | ||
The basic event | The basic event handler in FHEM is called {{Link2CmdRef|Lang=en|Anker=notify|Label=notify}}; another one is for example {{Link2CmdRef|Lang=en|Anker=DOIF|Label=DOIF}}. | ||
Please open a new tab in your browser with the [[Event monitor]] or open a telnet connection by: | Please open a new tab in your browser with the [[Event monitor]] or open a telnet connection by: | ||
| Zeile 153: | Zeile 153: | ||
inform timer | inform timer | ||
Now you will see all events in the telnet | Now you will see all events in the telnet connection or the Event Monitor. E.g.: | ||
2011-12-16 21:51:55 FS20 myPiri on-for-timer 120 | 2011-12-16 21:51:55 FS20 myPiri on-for-timer 120 | ||
If you mark the line you want to react on, you may ask the assistant in the Event Monitor to help you to define a reaction | If you mark the line you want to react on, you may ask the assistant in the Event Monitor to help you to define a reaction to such an event. This may be something like: | ||
define lampNotify notify myPiri set myLamp on | define lampNotify notify myPiri set myLamp on | ||
| Zeile 165: | Zeile 165: | ||
define lampNotify notify myPiri:on.* set myLamp on | define lampNotify notify myPiri:on.* set myLamp on | ||
To test if this notify acts as expected you may use the <code>trigger</code> command to simulate an event in the real world. E.g.: | To test if this notify or DOIF acts as expected you may use the <code>trigger</code> command to simulate an event in the real world. E.g.: | ||
trigger myPiri on-for-timer 120 | trigger myPiri on-for-timer 120 | ||
at, notify and other event handler like watchdog use either predefined FHEM commands, shell scripts or Perl one liners as arguments. For details and tips for Perl one liners please read the ''Perl specials'' section at the commandref. | [[at]], [[notify]] and other [[event handler]] like {{Link2CmdRef|Anker=DOIF_|Lang=de|Label=DOIF}}<ref>[[DOIF]] combines event control, time control, state machine and frontend in one modul</ref>, {{Link2CmdRef|Anker=sequence|Lang=de|Label=sequence}}<ref>[[sequence]] handles series of [[Event|events]]</ref>, {{Link2CmdRef|Anker=watchdog|Lang=de|Label=watchdog}}<ref>[[watchdog]] reacts on missing [[Event|events]]</ref> etc. use either predefined FHEM commands, shell scripts or Perl one liners as arguments. For details and tips for Perl one liners please read the ''Perl specials'' section at the commandref. | ||
You may use so-called regular expressions ("regex") to build more complex conditions. These regex can be applied for analysis of events and as well in the execution part of the notify. A short introduction | You may use so-called regular expressions ("regex") to build more complex conditions. These regex can be applied for analysis of events and as well in the execution part of the notify. A short introduction to regex is available e.g. here: https://regex101.com/. | ||
=== Combined time and event control === | |||
Combined time and event control is possible with [[DOIF/Einsteigerleitfaden,_Grundfunktionen_und_Erläuterungen#Beispiel_C.29:_Kombinierte_Ereignis-_und_Zeitsteuerung|DOIF (time and event control)]], notify and other modules. | |||
The example shows a timespan combined with a readings value. Between 6 am and 7 pm a lamp is switched on, if the measured brightness is lower than 40. If the condition gets false, the lamp is switched off. | |||
DOIF-Solution: | |||
define di_lamp DOIF ([06:00-19:00] and [sensor:brightness] < 40) (set lamp on) DOELSE (set lamp off) | |||
==Record and present data== | ==Record and present data== | ||
| Zeile 176: | Zeile 185: | ||
===Record data: Logging=== | ===Record data: Logging=== | ||
To save data/events/messages to a logfile, you have to create one or several {{Link2CmdRef|Anker=FileLog|Lang=en|Label=FileLog}} devices. There's a helper function called <code>autocreate</code> | To save data/events/messages to a logfile, you have to create one or several {{Link2CmdRef|Anker=FileLog|Lang=en|Label=FileLog}} devices. There's a helper function called <code>autocreate</code>. This also adds a logfile to devices automatically recognized and included by the autocreate mechanism. For manually added devices you can use the option {{Link2CmdRef|Anker=createlog|Lang=en|Label=createlog}} which may be used in case you want to add additional logfiles, too. To write just one logfile for several devices to be logged combined, use an appropriate regular expression. | ||
For subsequent graphical presentation of the logged data, FHEMWEB offers the wizard described below. | For subsequent graphical presentation of the logged data, FHEMWEB offers the wizard described below. | ||
The size of each logfile will be determined by its wildcard characters (year/month/week/day) | The size of each logfile will be determined by its wildcard characters (year/month/week/day). Please take a look at the {{Link2CmdRef|Anker=FileLog|Lang=en|Label=FileLog}} definition. You can enable archiving with the ''nrarchive'' or ''archivecmd'' attributes. | ||
Take a look at {{Link2CmdRef|Anker=dblog|Lang=en|Label=dblog}} to use a database instead of a regular file for logging. | Take a look at {{Link2CmdRef|Anker=dblog|Lang=en|Label=dblog}} to use a database instead of a regular file for logging. | ||
| Zeile 186: | Zeile 195: | ||
===From logged data to diagrams: Plotting=== | ===From logged data to diagrams: Plotting=== | ||
To build diagrams out of the logged data, just click on "Create SVG instance" in the detail view of each logfile. This will direct you to the ''gplot-Editor'', a wizard | To build diagrams out of the logged data, just click on "Create SVG instance" in the detail view of each logfile. This will direct you to the ''gplot-Editor'', a wizard guiding you through a lot of options to fulfill this task. | ||
[[Datei:Gplot-Editor1.png]] | [[Datei:Gplot-Editor1.png]] | ||
| Zeile 192: | Zeile 201: | ||
Choose which of your sets of data should be part of your diagram. You may also mix data originating from different sources for your diagrams. Please note: Sometimes it's necessary to click on {{Taste|write .gplot file }}, especially to get the possibility to switch between different data sources. | Choose which of your sets of data should be part of your diagram. You may also mix data originating from different sources for your diagrams. Please note: Sometimes it's necessary to click on {{Taste|write .gplot file }}, especially to get the possibility to switch between different data sources. | ||
There's also a ( | There's also a (German) article [[Plots_erzeugen|Plots erzeugen]] that will direct you to some practical examples. For further information also look at the commandref's {{Link2CmdRef|Anker=SVG|Lang=en|Label=SVG}} section. | ||
To include data in your diagrams not directly logged from within FHEM, add | To include data in your diagrams not directly logged from within FHEM, add the ''readonly'' parameter to the FileLog definition. Make sure that there are no other devices named identically and enter something like the following to the command field (usually '''''<regexp>''''' needs to be identical to the device name, i.e. '''''messages''''' in this case): | ||
:<code>define messages FileLog /var/log/messages <regexp> readonly </code> | |||
== Frontends: Adopting the web interface to your needs == | |||
So far [[FHEMWEB]] - to be exact FHEMWEB's default style "f18" has been used as user interface between you and the FHEM server. "f18" is capable to adopt the web sites to different display sizes for all kind of gadgets like mobile phones, tablets or computers. | |||
== | === Styles === | ||
To change FHEMWEB's look and feel, you may choose other color shemes or styles. You are not limited to just one scheme, but may use different styles or color schemes for different FHEMWEB instanzes<ref>Just use a different port for each of them</ref>. So you may see at one glance, if you are using a more administrative instance or just a very limited instance with just a few devices to interact<ref>For more info see commandref: {{Link2CmdRef|Anker=FHEMWEB|Lang=en|Label=FHEMWEB}} bzw. {{Link2CmdRef|Anker=allowed|Lang=en|Label=allowed}}</ref>. | |||
===Rooms and groups=== | ===Rooms and groups=== | ||
It makes sense to group your devices for structured access in FHEMWEB by setting the ''room'' and/or ''group<ref>To sort groups use the ''sortby'' attribute.</ref> ''attributes, attribute ''defaultRoom'' will mark a starting page. FHEMWEB puts devices without a ''room'' attribute into the "Unsorted" room, new room names will be added to the menu on the left<ref>For even more structuring options in rooms use the delimiter "->". This will generate sub-rooms, e.g. <code>attr <device> room MyLogics->Light</code>.</ref> . Devices in the room "hidden" will not be shown by default. | |||
It makes sense to group your devices for structured access in FHEMWEB by setting the ''room'' and/or ''group'' attributes. FHEMWEB puts devices without a ''room'' attribute into the "Unsorted" room, new room names will be added to the menu on the left. Devices in the room "hidden" will not be shown by default. | |||
You can also define a stripped down FHEMWEB instance by defining the menu entries to be hidden in the ''hiddenroom'' FHEMWEB attribute. | You can also define a stripped down FHEMWEB instance by defining the menu entries to be hidden in the ''hiddenroom'' FHEMWEB attribute. | ||
| Zeile 209: | Zeile 219: | ||
===More options on the frontend side=== | ===More options on the frontend side=== | ||
FHEMWEB offers a new style | FHEMWEB offers a new style, called '''[https://forum.fhem.de/index.php?topic=82351.0 f18]'''. This overcomes the need for several FHEMWEB instances for different screen sizes. Give it a try! | ||
Using a completely different frontend is also possible. Browse the wiki | Using a completely different frontend is also possible. Browse the wiki or forum board ''FHEM » Frontends'' to find the solution that fits your needs best! | ||
==Complex structures== | ==Complex structures== | ||
Put your devices | Put your devices into different rooms. You can use the <code>room=<roomname></code> filter to set different devices at once. This is just a simple example: See the {{Link2CmdRef|Anker=devspec|Lang=en|Label=devspec}} section for details. | ||
For more complex scenarios consider the {{Link2CmdRef|Anker=structure|Lang=en|Label=structure}} module. You can define different structure levels like floors, buildings, etc. and set all elements of a given structure at once. | For more complex scenarios consider the {{Link2CmdRef|Anker=structure|Lang=en|Label=structure}} module. You can define different structure levels like floors, buildings, etc. and set all elements of a given structure at once. | ||
| Zeile 223: | Zeile 233: | ||
*{{Link2CmdRef|Anker=update|Lang=en|Label=update}} - ([[update|Wiki]]) | *{{Link2CmdRef|Anker=update|Lang=en|Label=update}} - ([[update|Wiki]]) | ||
*{{Link2CmdRef|Anker=shutdown|Lang=en|Label=shutdown}} | *{{Link2CmdRef|Anker=shutdown|Lang=en|Label=shutdown}} | ||
*{{Link2CmdRef|Anker=DOIF|Lang=en|Label=DOIF}} - ([[DOIF|Wiki]]) | |||
*{{Link2CmdRef|Anker=notify|Lang=en|Label=notify}} - ([[notify|Wiki]]) | *{{Link2CmdRef|Anker=notify|Lang=en|Label=notify}} - ([[notify|Wiki]]) | ||
*{{Link2CmdRef|Anker=at|Lang=en|Label=at}} - ([[at|Wiki]]) | *{{Link2CmdRef|Anker=at|Lang=en|Label=at}} - ([[at|Wiki]]) | ||
| Zeile 228: | Zeile 239: | ||
*{{Link2CmdRef|Anker=cancel|Lang=en|Label=cancel}} | *{{Link2CmdRef|Anker=cancel|Lang=en|Label=cancel}} | ||
*{{Link2CmdRef|Anker=watchdog|Lang=en|Label=watchdog}} - ([[watchdog|Wiki]]) | *{{Link2CmdRef|Anker=watchdog|Lang=en|Label=watchdog}} - ([[watchdog|Wiki]]) | ||
==FHEM (TM) is a GPL'd perl server...== | |||
As FHEM is written in perl, most users will be reminded of it's perl nature at some point in time. Though it may not be mandatory for FHEM users to learn perl, it's highly recommended to also have a look at this programming language for getting deeper insights in what is going on in your home automation system. As often [[Regulärer Ausdruck|regular expressions (german)]] are used within the perl code, getting familiar with this toolset is also a good idea. To solve some problems you may encounter using perl and regex is the most efficient way to go. | |||
For first insight see {{Link2CmdRef|Anker=command|Lang=en|Label=FHEM command types}}, {{Link2CmdRef|Anker=perl|Lang=en|Label=Perl specials}} and the article [[99 myUtils anlegen|99 myUtils anlegen (german)]]. Despite beeing marked as outdated, [[DevelopmentIntroduction|this article]] and others in this sections still privide usefull futher info in English to more experienced users and experts. | |||
==References== | ==References== | ||
<references /> | <references /> | ||
[[Kategorie:FHEM]] | |||
[[Kategorie:FHEM-Verwendung]] | |||
Aktuelle Version vom 9. November 2023, 12:50 Uhr
Installation
First step is to install FHEM on your server (dedicated hardware or virtual machine). We provide instructions for different operating systems here.
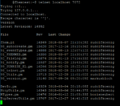
Having started FHEM the first time, please have a look at the FHEM logfile[1][2]. The log file will look something like the following example:
2018.03.09 09:17:51 1: Including fhem.cfg
2018.03.09 09:17:51 3: telnetPort: port 7072 opened
2018.03.09 09:17:51 3: WEB: port 8083 opened
2018.03.09 09:17:51 3: WEBphone: port 8084 opened
2018.03.09 09:17:51 3: WEBtablet: port 8085 opened
2018.03.09 09:17:51 2: eventTypes: loaded 0 events from ./log/eventTypes.txt
2018.03.09 09:17:51 1: usb create starting
2018.03.09 09:17:51 3: [...]
2018.03.09 09:17:51 1: usb create end
2018.03.09 09:17:51 0: Featurelevel: 5.8
2018.03.09 09:17:51 0: Server started with 9 defined entities (fhem.pl:16349/2018-03-07 perl:5.024001 os:linux user:fhem pid:9341)
Talking to FHEM
After installation, FHEM can be accessed by a FHEMWEBinterface to be found at the following URL: http://<fhem-server>:8083/fhem
Desktop version of the FHEM start screen just after installation
Smallscreen version of the start screen
A new telnet connection after issuing a version command


- Elements of the web interface
- The input box at the top is used to enter commands and here referred to as "command field". Finish your typing with Enter to pass the commands to FHEM for processing.
- Left of the command field there's a symbol (+). Clicking will prompt a popup field to enter RAW-Code - a very effective way to enter multiple command lines in one step.
- The menu on the left starts with the item Save config. FHEM allows to change its configuration at runtime. To make changes permanent and keep them available after restart of FHEM or the server hardware also, they have to be written to a configuration file[3]. If you see a red ? beneath this menu item, this indicates unsaved changes of your configuration.
- Below "Save config" is a section listing the "rooms" known by FHEM. At first start you will only find the rooms Unsorted and Everything. New rooms will automatically appear if you assign the respective attribute[4] to the devices[5] you add later on.
- The - preliminary - last section of the menu is built by some links you might find useful.
Securing the FHEM server component
As you have already seen, in a fresh installation you merely have to be in the same network segment to have full access to the FHEM server. There's no encryption nor authorization by user or password. This is why you get respective warnings at FHEM's starting page. FHEM may be secured using one of the following options:
allowed and SSL
These two methods may be combined and can be used to secure one or both ways (telnet and web interface) to interact with and configure FHEM. Allowed restricts access by user authentication, SSL adds transport layer encryption (HTTPS/SSL).
help <command> in the command field and press Enter.It is recommended to define one or more allowed devices. For instructions on how to do this, please have a look at our CommandRef or just pass help allowed to the command field.
As long as there's no allowed device defined, FHEM restricts all interfaces access' to the local network.
<command> <parameter> is not only used here, but is also very common in other documents and examples you'll find when using FHEM. In these cases you are asked to replace the placeholder in the brackets (including the "<>"-brackets) by your own meaningful content.
Additionally you may add for your FHEMWEB device, whose sole purpose is to serve you FHEM via browser, a HTTPS attribute to activate HTTPS for http connections. For telnet (being also to some extent also a TCP/IP port) please use the SSL attribute.
By default, none of these securing methods is activated. If you are securing your server and FHEM by other methods you may switch off the respective warning using the global attribute motd.
FHEM and the WWW
If you intend to have access to FHEM not only from your local net it is highly recommended to take additional measures. Common options are to use a VPN (Virtual Private Network) and/or a reverse proxy server like Apache or nginx.
Additional remarks on security
Please note: Running a server system requires regular updates to the operating system and other software components installed on it. Besides that, any other components you use for home automation will contribute to the level of (non-)security of the entire system you run in the end.
Interfaces to the real world
To get information about what is happening in the real world, you have to somehow connect FHEM with it.
Many FHEM installations use one or more USB devices (e.g. CUL, FHZ1x00, TCM, ZWave, ...) directly attached to the FHEM server for this task. To use this type of connection[6] you need additional pieces of software, especially the Perl module serial[7]. Have a look at the respective part of the commandref for details about the configuration of your USB device(s). The Perl module is not required if the device is connected via Ethernet (e.g. HM-LAN or CUNO).
Automatic Configuration
By default FHEM will try to identify commonly used USB devices like FHZ, CUL[8], COC, ZWave or TCM. These just have to be attached when FHEM is starting to have FHEM write the respective parts to its configuration file. When attaching devices to a running FHEM you have to issue a shutdown restart in the command field to start the auto configuration.
Typically you'll have to do additional configuration work also for automatically detected devices by assigning the appropriate values to attributes. You can easily get an overview of the available attributes and to some extent also a set of values for them by just clicking the name of the device shown in the respective room. New devices in most cases can be found in the room Unsorted.
Once you have basic definitions of all of your USB devices it's recommended to deactivate the automatic recognition of USB devices by entering attr initialUsbCheck disable 1 to the command field.
Manual Configuration
define <name> CUL <device> <FHTID>. Please replace the placeholders in the brackets with own content and also delete the brackets.USB devices can easily also be configured manualy, especially in cases they are not automatically detected as described above. After plugging them in, just look where these are located in your file system - typically somewhere in the directory /dev. E.g. a CUL will be found as a file /dev/ttyACM* in a Linux environment. Mac OS X will label the same device as /dev/cu.usbmodem*. Use this description (entire path and file name) to enter the define command directly in the command field.
Examples:
- A CUL stick can be defined like this:
define CUL1 CUL /dev/ttyACM0@9600 1234[9] - Z-Wave controller:
define ZWDongle ZWDongle /dev/serial/by-id/usb-0658_0200-if00@115200[10]
Please consult the commandref for further information on configuration of a specific device.
Adding and configuring sensors and actors
autocreate
By default, FHEM is also configured to automatically add to your configuration all kinds of devices it detects when running. This especially happens when you use RF equipment. FHEM will use its autocreate function as soon as the respective device sends data over the air.
So if you want to include sensors like S300 or FHT, all you have to do is to attach an appropriate USB device for reception of messages sent by your devices and wait, look out for changes in the logfile and refresh the FHEM webpage in your browser. The naming of newly detected devices is oriented on their technical parameters.
Rename
You may use the command rename to change this to your needs and likes. So for example for a FHT sensor you can type in the command field:
rename FHT_1234 fht.kitchen
Manual Definition of Devices
If you want to manually add a device or have to do so because autocreate won't work, you have to follow these steps:
Wait until the device sends some data. In the FHEM logfile (available via the menu at "Unsorted -> FileLog -> Logfile -> text") you may see e.g. the following line:
FS20 Unknown device <HOUSECODE>, Button <BTN> Code <CDE>, please define it
Add the new device by passing the following command to the command field:
define piri1 FS20 <HOUSECODE> <BTN>
Set the appropriate model attribute:
attr piri1 model fs20piri
Once you did that, the other attributes you may set are restricted to the ones that really apply to the chosen model. Also for other RF types of hardware devices not automatically recognized there should appear a similar line in the logfile.
The exact procedure to include other types of RF equipment typically varies.
E.g. HomeMatic devices do not necessarily need to be under full control of FHEM (paired). To be included by autocreate, a HomeMatic device has to send a pairing request, and FHEM has to enter a special mode to accept this request. Enter set CUL hmPairForSec 600 in the command field to make the latter happen and see the manual of the device how to do it on that end. ZWave devices require a similar procedure with slightly different commands.
Including Devices by Sending Configuration Commands
Some types of devices require special RF commands to configure them for usage with a central unit like FHEM or to link them directly with other devices (e.g. a PIR message used directly by a switch). To include that type of hardware, you have to first manually configure FHEM to prepare it to send out these so called learning messages.
E.g. a FS20 device can be defined like this:
define lamp1 FS20 1234 56
Prepare the device by pressing its physical registration button until the LED starts blinking. Then you click on the link in the device's FHEM web page to send out the learning command. The LED should stop blinking to indicate that it now is programmed to house code 1234 and device code 56. You may also use the 4-base ELV notation instead. Once this is sucessfully done, you may again set model specific attributes to limit the available options to ones relevant for this model, e.g.:
attr lamp1 model fs20st
Other types of RF systems (EnOcean/HomeMatic/ZWave) also need specific and substantial procedures to be followed to get these devices under full control of FHEM. Please have a look at the corresponding section of the commandref and the manual of the device before starting these procedures.
Basics about controlling your devices
Once your sensors and actors are correctly defined in FHEM you will be able to control any of your actors using FHEM's telnet or web interface.
Timer
The most basic way to implement timer functionality in FHEM is to define an "at". Examples and basic instructions you'll find in the commandref.
Reacting on events from the real world
If you want FHEM to react to any message sent by one or more sensors or other devices (an "event" in FHEM terminology), you use an event handler. The basic event handler in FHEM is called notify; another one is for example DOIF.
Please open a new tab in your browser with the Event monitor or open a telnet connection by:
telnet <fhemhost> 7072
Once the connection is opened type:
inform timer
Now you will see all events in the telnet connection or the Event Monitor. E.g.:
2011-12-16 21:51:55 FS20 myPiri on-for-timer 120
If you mark the line you want to react on, you may ask the assistant in the Event Monitor to help you to define a reaction to such an event. This may be something like:
define lampNotify notify myPiri set myLamp on
or
define lampNotify notify myPiri:on.* set myLamp on
To test if this notify or DOIF acts as expected you may use the trigger command to simulate an event in the real world. E.g.:
trigger myPiri on-for-timer 120
at, notify and other event handler like DOIF[11], sequence[12], watchdog[13] etc. use either predefined FHEM commands, shell scripts or Perl one liners as arguments. For details and tips for Perl one liners please read the Perl specials section at the commandref. You may use so-called regular expressions ("regex") to build more complex conditions. These regex can be applied for analysis of events and as well in the execution part of the notify. A short introduction to regex is available e.g. here: https://regex101.com/.
Combined time and event control
Combined time and event control is possible with DOIF (time and event control), notify and other modules.
The example shows a timespan combined with a readings value. Between 6 am and 7 pm a lamp is switched on, if the measured brightness is lower than 40. If the condition gets false, the lamp is switched off.
DOIF-Solution:
define di_lamp DOIF ([06:00-19:00] and [sensor:brightness] < 40) (set lamp on) DOELSE (set lamp off)
Record and present data

Record data: Logging
To save data/events/messages to a logfile, you have to create one or several FileLog devices. There's a helper function called autocreate. This also adds a logfile to devices automatically recognized and included by the autocreate mechanism. For manually added devices you can use the option createlog which may be used in case you want to add additional logfiles, too. To write just one logfile for several devices to be logged combined, use an appropriate regular expression.
For subsequent graphical presentation of the logged data, FHEMWEB offers the wizard described below.
The size of each logfile will be determined by its wildcard characters (year/month/week/day). Please take a look at the FileLog definition. You can enable archiving with the nrarchive or archivecmd attributes.
Take a look at dblog to use a database instead of a regular file for logging.
From logged data to diagrams: Plotting
To build diagrams out of the logged data, just click on "Create SVG instance" in the detail view of each logfile. This will direct you to the gplot-Editor, a wizard guiding you through a lot of options to fulfill this task.

Choose which of your sets of data should be part of your diagram. You may also mix data originating from different sources for your diagrams. Please note: Sometimes it's necessary to click on write .gplot file , especially to get the possibility to switch between different data sources.
There's also a (German) article Plots erzeugen that will direct you to some practical examples. For further information also look at the commandref's SVG section.
To include data in your diagrams not directly logged from within FHEM, add the readonly parameter to the FileLog definition. Make sure that there are no other devices named identically and enter something like the following to the command field (usually <regexp> needs to be identical to the device name, i.e. messages in this case):
define messages FileLog /var/log/messages <regexp> readonly
Frontends: Adopting the web interface to your needs
So far FHEMWEB - to be exact FHEMWEB's default style "f18" has been used as user interface between you and the FHEM server. "f18" is capable to adopt the web sites to different display sizes for all kind of gadgets like mobile phones, tablets or computers.
Styles
To change FHEMWEB's look and feel, you may choose other color shemes or styles. You are not limited to just one scheme, but may use different styles or color schemes for different FHEMWEB instanzes[14]. So you may see at one glance, if you are using a more administrative instance or just a very limited instance with just a few devices to interact[15].
Rooms and groups
It makes sense to group your devices for structured access in FHEMWEB by setting the room and/or group[16] attributes, attribute defaultRoom will mark a starting page. FHEMWEB puts devices without a room attribute into the "Unsorted" room, new room names will be added to the menu on the left[17] . Devices in the room "hidden" will not be shown by default.
You can also define a stripped down FHEMWEB instance by defining the menu entries to be hidden in the hiddenroom FHEMWEB attribute.
Edit the colors / fonts by changing the style.css ("Edit files" -> style.css) or create you own style (see stylesheetPrefix), so it won't be overwritten by the next update command.
More options on the frontend side
FHEMWEB offers a new style, called f18. This overcomes the need for several FHEMWEB instances for different screen sizes. Give it a try! Using a completely different frontend is also possible. Browse the wiki or forum board FHEM » Frontends to find the solution that fits your needs best!
Complex structures
Put your devices into different rooms. You can use the room=<roomname> filter to set different devices at once. This is just a simple example: See the devspec section for details.
For more complex scenarios consider the structure module. You can define different structure levels like floors, buildings, etc. and set all elements of a given structure at once.
Shortlist: commands to learn first
- list - (Wiki)
- define
- defmod
- version - (Wiki)
- update - (Wiki)
- shutdown
- DOIF - (Wiki)
- notify - (Wiki)
- at - (Wiki)
- sleep
- cancel
- watchdog - (Wiki)
FHEM (TM) is a GPL'd perl server...
As FHEM is written in perl, most users will be reminded of it's perl nature at some point in time. Though it may not be mandatory for FHEM users to learn perl, it's highly recommended to also have a look at this programming language for getting deeper insights in what is going on in your home automation system. As often regular expressions (german) are used within the perl code, getting familiar with this toolset is also a good idea. To solve some problems you may encounter using perl and regex is the most efficient way to go. For first insight see FHEM command types, Perl specials and the article 99 myUtils anlegen (german). Despite beeing marked as outdated, this article and others in this sections still privide usefull futher info in English to more experienced users and experts.
References
- ↑ In most cases you'll find the log in
/opt/fhem/log - ↑ Most installations use Linux as operating system for the server. So if not stated differently, the commands and examples provided here use the syntax for Linux
- ↑ In most cases this is a text file, but you may also use a database. See configDB for how to use a database as configuration source
- ↑ Further informationen on the terminology used in a FHEM context is provided in our glossary (german)
- ↑ Please note: The term "device" is often used used in the FHEM context in a special way. This could - but must not necessarily be - a physical piece of equipment. "Device" just is a term for any physical or virtual "object" that can be introduced in a FHEM system by a define or defmod command.
- ↑ This also applies when devices are attached using serial interfaces provided at GPIO pins of single-board computers like the Raspberry Pi.
- ↑ The Perl-serial-module can either be installed by issuing the
sudo cpan Device::SerialPortcommand at OS level or by installing precompiled Debian packages (libdevice-serialport-perl). Beginning with Mac OS X 10.5 (Leopard) the module is also provided as package. If the perl module is not available for your operating system you may use the @directio-option (see commandref for further information). - ↑ In a Linux environment, FHEM will also try to flash an attached CUL in case it's not yet programmed with firmware. For details see the descriptions of the commands
usbandCUL flashin commandref. - ↑ Please note: the number "1234" is just an example; replace this by your own parameter
- ↑ This type of representation of the USB device in the Linux file system can also be used. To get the information in that form, you just type
ls -l /dev/serial/by-idat operating system level - ↑ DOIF combines event control, time control, state machine and frontend in one modul
- ↑ sequence handles series of events
- ↑ watchdog reacts on missing events
- ↑ Just use a different port for each of them
- ↑ For more info see commandref: FHEMWEB bzw. allowed
- ↑ To sort groups use the sortby attribute.
- ↑ For even more structuring options in rooms use the delimiter "->". This will generate sub-rooms, e.g.
attr <device> room MyLogics->Light.