First steps in FHEM: Unterschied zwischen den Versionen
K →Creating rooms: Rohmaterial |
|||
| Zeile 70: | Zeile 70: | ||
== Creating rooms == | == Creating rooms == | ||
<!-- | |||
Im nächsten Schritt wollen wir Geräte ordnen und geeignet zusammenfassen. Beispielsweise könnten Sie es für sinnvoll erachten, die Geräte, die sich physisch (tatsächlich) in einem Raum befinden, auch in FHEM entsprechend anzuordnen. In einem "Schlafzimmer" sollen dann also entsprechende devices "Rolladen", "Zeitschalter" und "Radios" zu finden sein. Sie können aber auch andere Zuordnungen vornehmen; man könnte etwa alle Messinstrumente wie Thermometer, Stromzähler und Feuchtigkeitsfühler in einem (eventuell nur logisch und nicht physisch existierenden) Raum "Messinstrumente" erfassen. Der Name eines Raumes ist dabei beliebig. | |||
Um dies zu tun, müssen Sie allen devices, die zum Raum gehören sollen, ein "Attribut" (siehe oben) hinzufügen. Dieses Attribut heißt room und muss als Wert den Namen des Raumes bekommen. Versuchen wir dies für unseren dummy. Hierzu verwenden Sie folgenden Befehl (abschließen der Eingabe mit {{Taste|Enter}}): | |||
attr mySwitch1 room Training | |||
Durch diesen Befehl wird dem Device ''mySwitch1'' das Attribut ''room'' mit dem Wert ''Training'' hinzugefügt. Wieder gehören attr, mySwitch1 und room zur Befehlssyntax von FHEM und können nicht verändert werden, Training ist frei wählbar. | |||
''mySwitch1'' gehört jetzt zum room ''Training''. Durch diese Zuordnung ist dieser Raum in der Navigationsleiste links zur Liste der Räume hinzugefügt worden. Klicken Sie einmal auf den Raum ''Training''. | |||
[[Datei:ErsteSchritteInFhem04.png]] | |||
Es werden nun alle Geräte angezeigt, die diesem Raum zugeordnet wurden. Bisher haben wir hier nur ein Gerät: ''mySwitch1'', unseren dummy. | |||
Neben dem Device-Namen wird immer der Status des Device angezeigt, hier noch ''???''. | |||
Wenn Sie auf den Namen ''mySwitch1'' klicken, gelangen Sie wieder in dessen Detailansicht. | |||
Unser dummy wird in einem Block mit der Typbezeichnung ''dummy'' dargestellt. Diese Typbezeichnung können Sie ebenfalls ändern, wenn Sie ein weiteres Attribut "group" hinzufügen und einen (ebenfalls frei wählbaren) Namen vergeben: Gruppen sortieren devices innerhalb eines Raumes. | |||
Anmerkung: Wenn Sie einen Raum löschen wollen, so tun Sie dies, indem Sie sämtliche devices aus dem Raum entfernen. Für unser Beispiel des Raums ''Training'' bedeutet es, dass in allen devices das Attribut room entfernt wird. Der Raum ''Training'' verschwindet dann von alleine. | |||
--> | |||
== Creating switching commands == | == Creating switching commands == | ||
== Event monitor == | == Event monitor == | ||
Version vom 13. Juni 2017, 14:01 Uhr
| An dieser Seite wird momentan noch gearbeitet. |
Hier entsteht die englische Fassung von Erste Schritte in FHEM...
- Letzte Änderung der dt. Fassung: 05.12.2024
- Letzte Änderung der engl. Fassung: 13.06.2017
- Neuere Version ist: dt. Version
This a beginners course for those starting to work with FHEM. After you have installed FHEM on your server you may reproduce all steps without any additional smart home hardware.
This guide was primarily published by Ulrich Maass who permitted the use in FHEM wiki.
Note to editors: Everybody is called to improve orthography, grammar and style. Content changes and extentions should be discussed with the author (e. g. on associated discussion page).
First attempt
To start FHEM first time enter in your browsers address field:
http://<ip-address>:8083
e. g. http://192.168.1.1:8083.
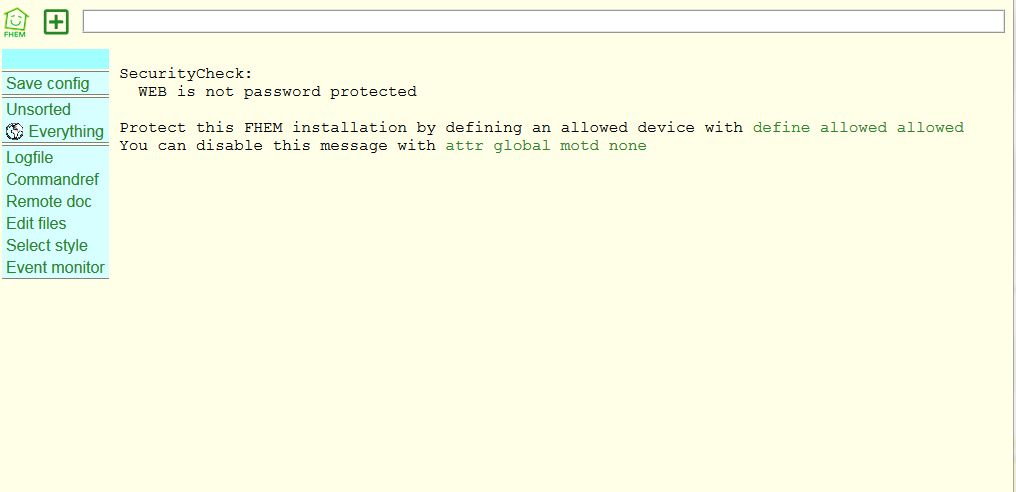
So you get FHEM homepage:
- At the head you can discover a white command line, where you may type in commands.
- As a first menu entry you can see button Save config, that is intended to store configuration changes beyond a FHEM restart.
- Beside this there are already rooms Unsorted and Everything, we will get to know later on.
- More links are collected in a lower group, we will discuss later on too.
Advice Security Check indicates that there is no FHEM password. Ho to configure a password protection you can see at FHEM command reference commandref, where you by the way may find a description of all FHEM functions and modules. To suppress this message as a start enter in command line:
attr global motd none
and confirm this change pressing Enter-button.
Creating device - define
The main component type in FHEM is called device.Typical devices are e.g. remote controlled outlets, roller shutter motors, temperature sensors, solenoid valves etc.
But there are other kinds of devices too, where at first view you wouldn't expect it: FHEM's user interface ("FHEMWEB") is a device, there are devices without a physical equipment used to store a variable's value.
Now we will create a very simple device, called dummy.
A device of type dummy is a special object, inasmuch as it nonessential needs corresponding physical equipment (physical lamp, roller shutter, solenoid valve). So we can proceed in this guide without a real hardware system, or rather we don't need to concider differences between differrent hardware. A dummy device is generally represented on FHEM's user interface like a FHEM device with a physical equivalent.
Lets begin with a switch. It is designed to simulate a light switch on the wall. Please, enter command in command field:
define mySwitch1 dummy
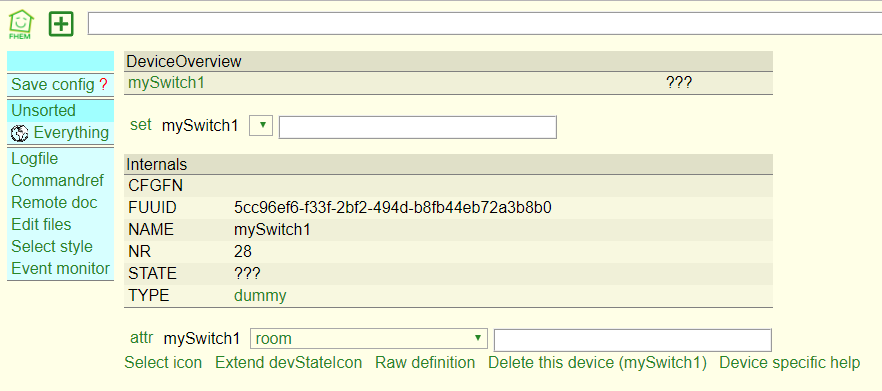
"define" is the needed FHEM command, "mySwitch1" the future name of our device, "dummy" describes its type. Words "define" and "dummy" are part of FHEM'S command syntax and are unalterable, "mySwitch1" is (more or less) arbitrary. After pressing button Enter detail view of our new FHEM device mySwitch1 appears.
Devices have a "state", changing in time and recorded by FHEM. E.g., some window is open, a shutter is closed, an outlet is under voltage. A state not necessary consists of exactly one value (window: "open" or "closed"), state can be described by a bunch of values (state of a Raspberry system - device type sysmon - contains CPU frequency, CPU temperature, load and much more).
Device status in FHEM consists of overall three blocks of values, called Internals, Attributes and Readings. It's early days yet to discuss in-depth meaning of these terms, but some remarks are important for our next steps:
- Internals store very basic informationen about a device. Only in rare cases users will edit directly internals (mostly during define step).
- Attributs control device behavior. Typically they can be changed (or even defined) by users.
- Readings have in contrast to the values of the other two blocks a timestamp. Usually they are measured values of your device.
It may be confusing for beginners that there can be Internals and Readings of equal names (e.g. STATE and state). Though Perl distinguishes lower and upper case.
- NAME: device name assigned by the user
- TYPE: device type of FHEM device, here: dummy
- STATE: device state shown in all summaries. Since there was no assignment till now it is initially ???.


