Quick-Start/en
| An dieser Seite wird momentan noch gearbeitet. |
Installation
First step is to install FHEM on your server (dedicated hardware or virtual machine). We provide instructions for different operating systems here.
Having started FHEM the first time, please have a look at the FHEM logfile[1][2]. The log file will look something like the following example:
2018.03.09 09:17:51 1: Including fhem.cfg
2018.03.09 09:17:51 3: telnetPort: port 7072 opened
2018.03.09 09:17:51 3: WEB: port 8083 opened
2018.03.09 09:17:51 3: WEBphone: port 8084 opened
2018.03.09 09:17:51 3: WEBtablet: port 8085 opened
2018.03.09 09:17:51 2: eventTypes: loaded 0 events from ./log/eventTypes.txt
2018.03.09 09:17:51 1: usb create starting
2018.03.09 09:17:51 3: [...]
2018.03.09 09:17:51 1: usb create end
2018.03.09 09:17:51 0: Featurelevel: 5.8
2018.03.09 09:17:51 0: Server started with 9 defined entities (fhem.pl:16349/2018-03-07 perl:5.024001 os:linux user:fhem pid:9341)
Talking to FHEM
FHEM offers two ways to interact and configure itself.
- A telnet interface at port 7072
- Websites (FHEMWEB) found at the following three locations:
- http://<fhem-server>:8083/fhem for normal desktop computer screen sizes
- http://<fhem-server>:8084/fhem for Smartphones and other devices with small display sizes
- http://<fhem-server>:8085/fhem for other mobile devices with medium display sizes like tablet PC's
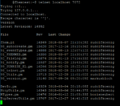
A new telnet connection after issuing a version command
Desktop version of the FHEM start screen just after installation
Smallscreen version of the start screen


- Elements of the web interface
- The input box at the top is used to enter commands and here refered to as "command field". Finish your typing with Enter to pass the commands to FHEM for processing.
- The menue on the left starts with the item Save config. FHEM allows to change its configuration at runtime. To make changes permanent and keep them available after restart of FHEM or the server hardware also, they have to be written to a configuration file[3]. If you see a red ? beneath this menue item, this indicates unsaved changes of your configuration.
- Below "Save config" is a section listing the "rooms" known by FHEM. At first start you will only find the rooms Unsorted and Everything. New rooms will automatically appear if you assign the respective attribute[4] to the devices[5] you add later on.
- The - preliminary - last section of the menue is built by some links you might find useful.
Securing the FHEM server component
As you have already seen, in a fresh installation you just have to be in the same network segment to have full access to the FHEM server. There's no encryption nor authorization by user or password. This is why you get respective warnings at FHEM's starting page. FHEM may be secured using one of the following options:
allowed and SSL
These two methods may be combined and can be used to secure one or both ways (telnet and web interface) to interact with and configure FHEM. Allowed restricts access by user authentication, SSL adds transport layer encryption (HTTPS/SSL).
help <command> in the command field and press Enter.It is recommended to define one or more allowed devices. For instructions on how to do this, please have a look in ourCommandRef or just pass help allowed to the command field.
As long as there's no allowed device defined, FHEM restricts all interfaces access' to the local network.
<command> <parameter> is not only used here, but is also very common in other documents and examples you'll find when using FHEM. In these cases you are asked to replace the placeholder in the brackets (including the "<>"-brackets) by your own meaningful content.
Additionally you may add for your FHEMWEB device, which sole purpose is to serve you FHEM via browser, a HTTPS attribute to activate HTTPS for http connections. For telnet (being also to some extent also a TCP/IP port) please use the SSL attribute.
By default, none of these securing methods is activated. If you are securing your server and FHEM by other methods you may switch of the respective warning using the global attribute motd.
FHEM and the WWW
If you intent to have access FHEM not only from your local net it is highly recommended to take additional measures. Common options are to use a VPN (Virtual Private Network) and/or a reverse proxy server like Apache or nginx.
Additional remarks on security
Please note: Running a server system requires regular updates on the operating system and other software components installed on it. Besides that, any other components you use for home automatisation will contribute to the level of security of the entire system you run in the end.
Interfaces to the real world
To get information about what is happening in the real world, you have to somehow connect FHEM with it.
A lot of FHEM installations use one or more USB devices (e.g. CUL, FHZ1x00, TCM, ZWave, ...) directly attached to the FHEM server for this task. To use this type of connection[6] You need additional pieces of software, especially the Perl module serial[7]. Have a look at the respective part of the commandref for details about the configuration of your USB device(s). The Perl module is not required if the device is connected via ethernet (e.g. HM-LAN or CUNO).
Automatic Configuration
By default FHEM will try to identify commonly used USB-devices like FHZ, CUL[8], COC, ZWave or TCM. These just have to be attached when FHEM is starting to have FHEM write the respective parts to it's configuration file. When attaching devices to a running FHEM you have to issue a shutdown restart in the command field to start the auto configuration.
Typically you'll have to make additional configuration work also for automatically detected devices by assigning the appropriate values to attributes. You can easily get an overview on the available attributes and to some extend also a set of values for them by just clicking the name of the device shown in the respective room. New devices in most cases can be found in the room Unsorted.
Once you have basic definitions of all of your USB devices it's recommended to deactivate the automatic recognition of USB devices by entering >code>attr initialUsbCheck disable 1 to the command field.
Manual Configuration
define <name> CUL <device> <FHTID>. Please replace the placeholders in the brackets with own content and also delete the brackets.USB devices can easily also be configured manualy, especially in cases they are not automatically detected as described above. After plugging them in, just look where these are located in your file system - typically somewhere in the directory /dev. E.g. a CUL will be found as a file /dev/ttyACM* in a Linux environment. Mac OS X will label the same device as /dev/cu.usbmodem*. Use this description (entire path and file name) do enter the define command directly in the command field.
Examples:
- A CUL-Stick can be defined like this:
define CUL1 CUL /dev/ttyACM0@9600 1234[9] - Z-Wave-Controller:
define ZWDongle ZWDongle /dev/serial/by-id/usb-0658_0200-if00@115200[10]
Please consult the commandref for further information on configuration of a specific device.
Adding and Configuring Sensors and Aktors
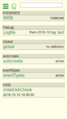
autocreate
By default, FHEM is also configured to automatically add to your configuration all kind of devices it detects when running. This especially happens when you use RF equipment. FHEM will use it's autocreate function as soon as the respective device sends data over the air.
So if you want to include sensors like S300 or FHT, all you have to do is to attach an appropriate USB-device for reception of messages sent by your devices and wait, have a look on changes in the logfile and refresh the FHEM webpage in your browser. The naming of newly detected devices is oriented on their technical parameters.
Rename
You may use the command rename to change this to your needs and likes. So for example for a FHT sensor you can type in the command field:
rename FHT_1234 fht.kitchen
Manual Definition of Devices
If you want to manually add a device or have to do so because autocreate won't work, you have to follow these steps:
Wait until the device sends some data. In the FHEM logfile (available via the menue unter "Unsorted-> FileLog -> Logfile -> text") you may see e.g. the following line:
FS20 Unknown device <HOUSECODE>, Button <BTN> Code <CDE>, please define it
Add the new device by passing the following command to the command field:
define piri1 FS20 <HOUSECODE> <BTN>
Set the appropriate model attribute:
attr piri1 model fs20piri
Once you did that, the other attributes you may set are restricted to the ones that really apply to the chosen model. Also for other RF type of hardware devices not automatically recognized there should apear a similar line in the logfile.
The exact procedure to include other type of RF equipment typically varies.
E.g. HomeMatic devices not necessarily need to be under full control of FHEM (paired). To be included by autocreate a HomeMatic device has to send a pairing request, and FHEM has to enter a special mode to accept this request. Enter set CUL hmPairForSec 600 in the command filed to make the later happen and see the manual of the device how to do it on that end. ZWave devices require a similar procedure with slightly different commands.
Including Devices by Sending Configuration Commands
Some type of devices require special RF commands to configure them for the usage with a central unit like FHEM or to link them directly with other devices (e.g. a PIR message used directly by a switch). To include that type of hardware, you have to first manually configure FHEM to prepare it to send out these so called learning messages.
E.g. a FS20 device can be defined like this:
define lamp1 FS20 1234 56
Prepare the device by pressing it's physical registration button until the LED starts blinking. Then you klick on the link in the device's FHEM web page to send out the learning command. The LED should stop blinking to indicate it now is programmed to house code 1234 and device code 56. You may also use the 4-base ELV notation instead. Once this is sucessfully done, you may again set model specific attributes to limit the available options to ones relevant for this model, e.g.:
attr lamp1 model fs20st
Other type of RF systems (EnOcean/HomeMatic/ZWave) need also specific and substantial procedures to follow to get these devices under full control of FHEM. Please have a look in the corresponding section of the commandref and the manual of the device before starting these procedures.
Basics about Controlling Your Devices
Once your sensors and actors are correctly defined in FHEM you are able to control any of your actors using FHEM's telnet or web interface.
To make full usage of FHEM's powerful options and to start the development of a control system that reacts on things happening in the real world and include timer functions you need additional components. In FHEM, these pieces of software are called "modules". A lot of these modules you have already installed as part of the FHEM installation process. Descriptions on them are available in the commandref. So let's have a look on some essential modules:
Timer
The most basic way to implement timer functionality in FHEM is to define an "at". Examples and basic instructions you'll find in the commandref.
Reacting on Events in the Real World
If you want FHEM to react to any message sent by one ore more sensors or other device (an "event" in FHEM terminology), you use a so-called event-handler. The basic event-handler in FHEM is called notify.
Please open a new tab in your browser with the Event monitor or open a telnet connection by:
telnet <fhemhost> 7072
Once the connection is opened type:
inform timer
Now you will see all events in the telnet-Connection or the Event Monitor. E.g.:
2011-12-16 21:51:55 FS20 myPiri on-for-timer 120
If you mark the line with the line you want to react on, you may ask the assistant in the Event Monitor to help you to define a reaction on such an event. This may be something like:
define lampNotify notify myPiri set myLamp on
or
define lampNotify notify myPiri:on.* set myLamp on
To test if this notify acts as expected you may use the trigger command to simulate an event in the real world. E.g.:
trigger myPiri on-for-timer 120
at, notify and other event-handler like watchdog use either predefined FHEM commands, shell scripts or Perl oneliners as arguments. For details and tips for Perl oneliners please read the Perl specials section in commandref. You may use so-called regular expressions ("regex") to build more complex code. These regex can be applied for analysis of events and as well in the execution part of the notify. A short introduction in regex is available e.g. here: https://regex101.com/.
Record and present data
Loging
To save data/events/messages to a log file, you have to create a device of type logfile. autocreate creates a log file alongside with any newly created device. To create it later on, use create log.
Take a look to contrib/dblog to use a database instead of a regular file for logging.
FHEMWEB supports FileLog devices by some predefined functions. See the next section for more details.
You can control the name of a FileLog device, how much files are keeped by nrarchive and which command is used to archive a FileLog with archivecmd.
Plots
Alongside any newly created device, autocreate creates a plot for it. Here you will learn how to combine different devices into one plot.
The source of any plot is one or more FileLog. You can control which data is plotted by modifying the used regular expression. By setting the logtype attribute, you control what template file (.gplot, gnuplot, file extension) is used for a plot. An overview can be found at the menue entry Edit files. The gnuplot files are containing the corresponding FileLog examples.
Please keep in mind, that the gnuplot files are also used when rendering SVG instead of gnuplot.
#FileLog entries are mandatory for any gnuplot file to be used with gnuplot scroll or SVG. This lines will be ignored by gnuplot, but not by FHEM. If
Die gnuplot-Dateien müssen #Filelog-Einträge haben, damit sie mit gnuplot scroll oder SVG benutzt werden können (Diese Zeilen werden von gnuplot, aber nichrt von FHEM, als Kommentare behandelt). Wenn die Auswahl mittels der FileLog get-Funktion erfolgen soll, dann lesen Sie sich für die Syntax die mitgelieferten gnuplot-Dateien oder den column_spec Abschnitt hier durch.
Beispiele:
   attr em1000log logtype power8:Power,text
   attr fs20_log logtype fs20:Plot,text
   attr hms100th_log logtype temp4hum6:Plot,text
Lassen Sie sich das Diagramm (/denPlot) anzeigen, indem Sie darauf klicken und erstellen Sie einen Weblink der seine eigenen Attribute hat. Wenn der Weblink zur aktuellen Logdatei gehört, dann wird er als aktueller Weblink gespeichert und angezeigt (Sie müssen ihn nicht erneut definieren, wenn sich in seinem Dateinamen die Bezeichnungen für Jahr/Monat/Datum ändern).
Die Logs können entweder mit gnuplot (welches im aktuellen Pfad installiert sein muss), oder mittels des im Programm enthaltenen SVG-Moduls erstellt werden. In diesem Fall muss Ihr Browser SVG unterstützen. Alle Browser unterstützen SVG, ausser dem Internet Explorer vor der Version 9 und Android vor der Version 3.0. Wenn Sie ein Gerät mit diesen Android-Versionen benutzen, dann versuchen Sie bitte als Browser Opera oder Firefox.
Der voreingestellte Modus ist SVG. Um das zu ändern, setzen Sie die plotmode Attribute auf gnuplot oder gnuplot scroll.
Um ältere Daten anzeigen zu lassen, erstellen Sie bitte einen anderen Weblink und setzen das fixedrange-Attribut auf z.B.:
attr weblink_1 fixedrange 2006-01-01 2007-01-01
Um fremde (nicht unter FHEM erfasste) Daten als Plot oder als normalen Text anzuzeigen, erstellen Sie bitte ein fake-Logfile mit dem korrekten Dateinamen und einer unbenutzten regexp, z.B.:
define messages FileLog /var/log/messages fakelog
FHEMWEB (pgm2) anpassen
Räume und Gruppen
Es ist in der Regel zu empfehlen, alle Geräte in Räumen zu gruppieren und auch innerhalb der Räume sinnvoll anzuordnen, indem Sie das group-Attribut setzen. FHEMWEB zeigt Geräte ohne Raum-Attribut im Raum (Menüpunkt) Unsorted. Fügen Sie Geräten das hidden Raumattribut hinzu, so werden diese Geräte nicht auf der Webseite angezeigt.
Sie können ein kürzeres Menü auf der Webseite erzeugen, indem Sie Menüpunkte die nicht angezeigt werden sollen mit dem Attribut hiddenroom versehen.
Farben und Schriften können Sie durch Anpassung der Datei style.css ändern (Edit files -> style.css) oder Sie erstellen Ihren eigenen Stil (siehe auch stylesheetPrefix) dann wird Ihr neuer Stil auch nicht beim nächsten Ausführen des update-Kommandos überschrieben.
Andere Frontends
FHEMWEB kann mit dem neuen Style "f18" auch auf eine dynamischere Darstellung für verschiedene Bildschirmgeräte und -größen eingestellt werden. Darüber hinaus besteht die Möglichkeit, andere Frontends an FHEM anzubinden und darüber Ihre Geräte zu steuern und darzustellen. Entsprechende Hinweise finden Sie hier im Wiki und in dem Forumsbereich dazu.
Komplexe Strukturen
Um gleichzeitig verschiedene Geräte auf einmal anzusprechen, kann mit Filtern und Abfragen gearbeitet werden. Details entnehmen sie bitten dem devspec Abschnitt der commandref. Z.B. können Sie die room=<roomname> Spezifikation verwenden, um gleichzeitig alle diesem Raum zugeordneten Geräte auf einmal anzusprechen.
Für noch komplexere Szenarien informieren sie sich bitte über das structure-Modul. Sie können verschiedene Ebenen wie Flure, Gebäude usw. definieren und alle Geräte einer definierten Struktur auf einmal ansprechen.
Wichtige Befehle für die erste Zeit
Hinweise
- ↑ In most cases you find the log in
/opt/fhem/log - ↑ Most installations use Linux as operating system for the server. So if not stated differently, the commands and examples provided here use the syntax for Linux
- ↑ In most cases this is a text file, but you may also use a database. See configDB for how to use a database as configuration source
- ↑ Further informationen on the terminology used in a FHEM context is provided in our glossary (german)
- ↑ Please note: The term "device" is often used used in the FHEM context in a special way. This could - but must not necessarily be - a physical piece of equipment. "Device" just is a term for any physical or virtual "object" that can be introduced in a FHEM system by a define or defmod command.
- ↑ This also applies when devices are attached using serial interfaces provided at GPIO PINs of single-board computers like the Raspberry Pi.
- ↑ The Perl-serial-module can either be installed by issuing the
sudo cpan Device::SerialPortcommand at OS level or by installing precompiled Debian packages (libdevice-serialport-perl). Beginning with Mac OS X 10.5 (Leopard) the module is also provided as package. If the perl module is not available for your operating system you may use the @directio-option (see commandref for further information). - ↑ In a Linux environment FHEM will also try to flash am attached CUL in case it's not yet programmed with firmware. For details see the descriptions of the commands
usbandCUL flashin commandref. - ↑ Please note: the number "1234" is just an example; replace this by your own parameter
- ↑ This type of representation of the USB device in the Linux file system can also be used. To get the information in that form, you just type
ls -l /dev/serial/by-idat operating system level