Benutzer:Rstooks21/Kiosk UI
| This Page is Work in progress. |
Kiosk UI
This is an approach to the dynamic creation of a Kiosk UI that can be used by anyone visiting the home. There will be multiple, small, possibly wall mounted Kiosk screens - one in each physical room. The Kiosk UI controls only the devices that are located in the same [FHEM] Room.
The Objective
To use the new FHEM Tablet UI (FTUI3) to create a tabbed UI showing just the devices in the same FHEM room. This tabbed UI allows the most important device controls to be shown by default and at the same time allow other devices to be controlled in as few clicks/screen touches as possible. As well as this, each Panel should not ever display scroll bars.
The rooms selected for testing had some or all of:
- Lighting (Shelly RGDW LED Controller and Shelly DImmer 2, defined to FHEM as Shelly devices)
- Audio (Logitech Media Players defined to FHEM as SBPLAYER devices)
- Heating (EQ3 MAX! WallMountedThermostat and RadiatorThermostat, defined as MAX devices)
With a simple call, the Kiosk displays the default Panel, with dynamic tabs for other device control Panels (a tab will only be shown if the room has that type of device). The default Panel will be implemented in the following order:
- Lighting first
- If no Lighting, then Audio
- If no Lighting or Audio, then Heating
- If no supported devices are in the room, then the clock.
This web address is intended to be used in a browser in Kiosk mode
http[s]://fhem-location:8083/fhem/kiosk/kiosk.html?room=Kitchen
The "?room=Kitchen" is used to filter devices in the FHEM room "Kitchen"
The Panels
All the panels time out to the primary panel after 60 seconds of non use.
The Lighting Panels
Main Panel
The main Lighting Panel is a simple On/Off switch and dimmer slider. The single control will control all of the lights in the room equally
- turning them all off or on
- dimming all lights in proportion
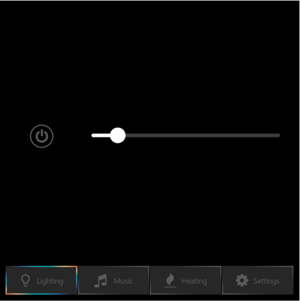
Note the four dynamic tabs:
- Lighting (currently active)
- Music
- Heating
- Settings - The Lighting tab has further settings that can be adjusted.
Settings/Scene Selector Panel
Selecting the "Settings" tab allows the user to select a scene - a combination of light settings that have been previously saved (by the user in the Kiosk UI)
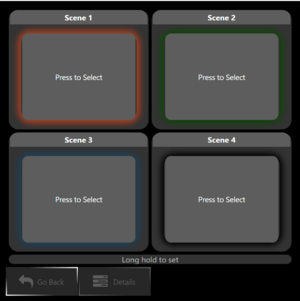
The light settings for all lights in the room are recalled by a short press to any of the buttons.
The current light settings for all lights in the room are stored as a scene by pressing and holding the relevant button. This causes the scene to be saved and the button to glow with the average light colour and intensity for all lights that are on.
The Details Panel
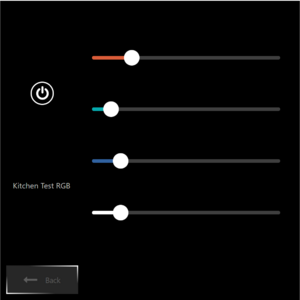
From the Scene Selector Panel it is possible to control every light in the room individually. The Details Panels are flexed to display up to three lights each with as many Panels as needed:
The Audio Panel
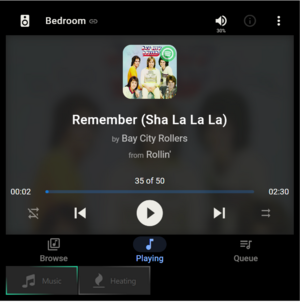
The Audio Panel uses an IFRAME to embed the Logitech Media Server web interface into the panel. Only the player in the room can be controlled - the other players cannot be unless they are synchronised. This is a bit of a cheat as the facilities in FHEM to control the player and display album art are not used. But why reinvent?
The Heating Panel
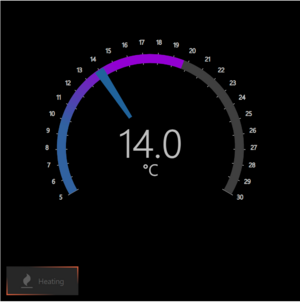
The Heating Panel prioritises control of the room's temperature using a Wall Mounted Thermostat, if one is available. If not, it is assumed that one of the Radiator Thermostats can be used and that all, if more than one, are linked together.
The Heating Panel just allows the setting of the temperature in the same room. None of the other room's temperatures may be set, nor can any "scenes" be set.
Prerequisites
The FTUI3 code, available from GITHUB should be downloaded and added to FHEM following the instructions here: https://github.com/knowthelist/ftui
Create an HTTPSRV address for the kioskUI:
define kioskUI HTTPSRV kiosk /opt/fhem/www/ftui Kiosk
Code
All files are in this zip
There is a lot of detail about how it works in here to aid understanding.
It could also help a user understand how the basic framework can be extended to include additional devices as there are examples of a simple IFRAME Panel, a relatively simple Thermostat Panel and a complex set of Lighting Panels.
The FTUI-TAB-VIEWs are more designed to be operated from a single set of FTUI-TAB elements - you click one and it becomes active, displaying the correct TAB-VIEW. This operating model did not readily lend itself to dynamic tabs - visible on some panels but not others, so new FTUI-TAB elements appear with every FTUI-TAB-VIEW
Kiosk HTML
The HTML is divided into three sections
Initializing FTUI3
In the <HEAD> the FTUI3 code and META tags that configure it are defined. This implementation choses not to use Toast messages. The viewport is defined as non-scalable as well.
<!DOCTYPE html>
<html>

<head>
  <!--
    /* FHEM tablet ui - FTUI */
    /**
    * UI builder framework for FHEM
    *
    * Version: 3.0.0
    *
    * Copyright (c) 2015-2021 Mario Stephan <mstephan@shared-files.de>
    * Under MIT License (http://www.opensource.org/licenses/mit-license.php)
    * https://github.com/knowthelist/ftui
    */
    -->
  <script src="ftui.js"></script>

  <link href="ftui.css" rel="stylesheet">
  <link href="themes/ftui-theme.css" rel="stylesheet">
  <link href="favicon.ico" rel="icon" type="image/x-icon" />

  <!-- avoid 300ms delay on click-->
  <meta name="viewport" content="width=device-height, height=device-width, user-scalable = no, initial-scale = 1, maximum-scale = 1, minimum-scale = 1">

  <meta name="mobile-web-app-capable" content="yes">
  <meta name="toast_position" content="topLeft">
  <meta name="toast" content="0">
  <meta name="fhemweb_url" content="http://<your-url>:8083/fhem/">
  <meta name="refresh_interval" content="60">

  <!-- verbose level 0-4 -->
  <meta name="debug" content="0">
Initialize the Kiosk
.This code is also in the <HEAD>. Should a Kiosk specific theme be required, this can be included here
  <!-- SET UP THE KIOSK -->
  <title>KIOSK</title>
  <script src="./kiosk/light_class.js"></script>
  <script src="./kiosk/init.js"></script>
  <script src="./kiosk/light_functions.js"></script>
  <link href="./kiosk/kiosk_styles.css" rel="stylesheet"/>
  <!-- <link href="./kiosk/kiosk-theme.css" rel="stylesheet"> -->

  </head>
body - The Outline Panels
The <BODY> contains outlines of the Panels, ready for customisation by the JavaScript.
The body has a kiosk_onLoad() function - this is part of the Kiosk customisation and is called to customise the predefined panels once the outlines have been loaded.
<body class="body" onload="kiosk_onLoad()">
The first tab defined is a clock. This should only ever be shown if there are no controllable devices in the room. It's included so that this is obvious (for instance if something has gone wrong with the Kiosk definition). There are also three clickable tabs in this panel. These allow the configuration to be manually checked when something has gone wrong.
<ftui-tab-view id="Clock" active>
    <ftui-row class="kiosk-panel-row" style="height:90vh">
    <ftui-grid-tile row="1" col="1" shape="round" color="primary">
      <ftui-row >
        <ftui-clock format="ee" size="6"></ftui-clock>
        <ftui-clock format="DD" size="5"></ftui-clock>
      </ftui-row>
      <ftui-clock format="hh:mm" size="9"></ftui-clock>
    </ftui-grid-tile>
    </ftui-row>
    <ftui-row class="kiosk-tab-row" style="height:10vh">
    <ftui-grid-tile  col="4" width="0.25">
      <ftui-tab view="Lighting-Main"  id="click-lighting">
        <ftui-icon name="lightbulb"></ftui-icon>
      </ftui-tab>
    </ftui-grid-tile>
    <ftui-grid-tile col="2" width="0.25">
      <ftui-tab view="Player-Main" id="click-player">
        <ftui-icon name="music"></ftui-icon>
        <ftui-label>Music</ftui-label>
      </ftui-tab>
    </ftui-grid-tile>
    <ftui-grid-tile col="3"  width="0.25">
      <ftui-tab view="Heating-Main"  id="click-heating" >
        <ftui-icon name="fire"></ftui-icon>
      </ftui-tab>
    </ftui-grid-tile>
      <ftui-grid-tile col="1" width="0.25" >
        <ftui-tab view="Clock" id="click-clock">
          <ftui-icon name="clock-o"></ftui-icon>
        </ftui-tab>
    </ftui-grid-tile>
      </ftui-row>
  </ftui-tab-view>
The next section defines the main panels for the Lighting,
<ftui-tab-view id="Lighting-Main">
      <ftui-row class="kiosk-panel-row">
        <ftui-column width="25%">
          <ftui-button id="LightingPower"
                       value="off" fill="outline" shape="circle" states="on,off" color="gray"
                       @value-change='powerChange($event)'>
            <ftui-icon name="power-off"></ftui-icon>
          </ftui-button>
        </ftui-column>
        <ftui-column width="75%">
          <ftui-slider  id="LightingDimmer"
                        value="1" min="1" max="100"
                        color="white"
                        @value-change="dimmerChange($event)"
                        >
          </ftui-slider>
        </ftui-column>
      </ftui-row>
      <ftui-row id="Lighting-Tabs" class="kiosk-tab-row" >
        <ftui-column id="Lighting-Scenes-Tab" class="kiosk-tab-inactive">
            <ftui-tab class='kiosk-button' view="Lighting-Scenes" timeout="60">
              <ftui-icon name='cog'></ftui-icon>
              <ftui-label>Settings</ftui-label>
            </ftui-tab>
          </ftui-column>
      </ftui-row>
    </ftui-tab-view>
Heating
<ftui-tab-view id="Heating-Main" >
    <ftui-row id="Heating-Tabs"class="kiosk-tab-row" >
    </ftui-row>
    </ftui-tab-view>
and Audio
<ftui-tab-view id="Player-Main" >
      <ftui-row class="kiosk-panel-row">
      <iframe  id="Player-kiosk" src="" style="height:90vh;width:100vw;overflow:hidden;padding:0px;border:none;margin:0px"></iframe>
      </ftui-row>
      <ftui-row id="Player-Tabs" class="kiosk-tab-row">
      </ftui-row>
</ftui-tab-view>
The Scenes Tab and Success Popup (line 164) are also defined. At line 150, the tab selector for the first Lighting Detail Panel is created:
<ftui-tab-view id="Lighting-Scenes">
      <ftui-row class="kiosk-panel-row" style="gap:5em;">
        <ftui-grid margin="5" shape="round">
        <ftui-grid-tile row="1" col="1" width='1' height='1' class="kiosk-scene-button">
          <ftui-grid-header class='scene_header' id='scene1_header' color="medium">Scene 1</ftui-grid-header>
          <ftui-button id='scene1' style='box-shadow:0px 0px 10px 5px #B26464;border-radius:var(--grid-tile-border-radius);text-align:center;' fill="solid" color="medium" @hold="save_scene(this)" @click="show_scene(this)" class="kiosk-scene-button" >Press to Select</ftui-button>
        </ftui-grid-tile>
        <ftui-grid-tile row="1" col="2" width='1' height='1' class="kiosk-scene-button" >
          <ftui-grid-header class='scene_header' id='scene2_header' color="medium">Scene 2</ftui-grid-header>
          <ftui-button id='scene2' style='box-shadow:0px 0px 10px 5px #FF6464;border-radius:var(--grid-tile-border-radius);text-align:center;' fill="solid" color="medium"  @hold="save_scene(this)" @click="show_scene(this)" class="kiosk-scene-button"><p>Press to Select</p></ftui-button>
        </ftui-grid-tile>
        <ftui-grid-tile row="2" col="1" width='1' height='1' class="kiosk-scene-button">
          <ftui-grid-header  class='scene_header' id='scene3_header' color="medium">Scene 3</ftui-grid-header>
          <ftui-button id='scene3' style='box-shadow:0px 0px 10px 5px #64C9C9;border-radius:var(--grid-tile-border-radius);text-align:center;' fill="solid" color="medium"  @hold="save_scene(this)" @click="show_scene(this)" class="kiosk-scene-button"><p>Press to Select</p></ftui-button>
        </ftui-grid-tile>
        <ftui-grid-tile row="2" col="2" width='1' height='1' class="kiosk-scene-button">
          <ftui-grid-header  class='scene_header' id='scene4_header' color="medium">Scene 4</ftui-grid-header>
          <ftui-button id='scene4' style='box-shadow:0px 0px 10px 5px #1F6F3F;border-radius:var(--grid-tile-border-radius);text-align:center;' fill="solid" color="medium"  @hold="save_scene(this)" @click="show_scene(this)" class="kiosk-scene-button"><p>Press to Select</p></ftui-button>
        </ftui-grid-tile>
        <ftui-grid-tile row="3" col="1" width='2' height='0.1'>
          Long hold to set
        </ftui-grid-tile>
      </ftui-grid>
      </ftui-row>
      <ftui-row id="Lighting-Scenes-Tabs" class="kiosk-tab-row" >
        <ftui-column id="Lighting-Scenes-Back-Tab" class="kiosk-tab-active-back">
            <ftui-tab class='kiosk-button' view="Lighting-Main">
              <ftui-icon name='reply'></ftui-icon>
              <ftui-label>Go Back</ftui-label>
            </ftui-tab>
          </ftui-column>
        <ftui-column id="Lighting-Settings-Detail0-Tab" class="kiosk-tab-inactive">
            <ftui-tab class='kiosk-button' view="Lighting-Setting-Detail0"  timeout="60">
              <ftui-icon name='tasks'></ftui-icon>
              <ftui-label>Details</ftui-label>
            </ftui-tab>
          </ftui-column>
      </ftui-row>
    </ftui-tab-view>

    <ftui-label id="scene-success-click" @click='scene_success.open()' style="display:none"></ftui-label>
    <ftui-popup id="scene_fail" timeout="15" color="warning">
      <header>Failed To Save</header>
      <ftui-label>Failed to Save Scene</ftui-label>
    </ftui-popup>
    <ftui-popup id="scene_success" timeout="5">
      <header>Saved</header>
      <ftui-label>Scene Saved</ftui-label>
    </ftui-popup>
Kiosk JavaScript
The JavaScript is split into three files:
- light_class.js is a class that is used to define each light controlled by the UI. It contains functions used to aid the communication with FHEM and FTUI3 - mutation observers and simple functions for hex conversion
- init.js is all the code used to set up the UI and initialise the display Panels
- light_functions.js is the code use to manage the lighting Panels as these are far more complex and don't rely on native FTUI3
light_class.js
Properties
The light class has these properties:
this.name = '';
this.mode = '';
this.red = 0;
this.green = 0;
this.blue = 0;
this.white = 0;
this.state = 'off';
this.scene1 = 'off';
this.scene2 = 'off';
this.scene3 = 'off';
this.scene4 = 'off';
this.state = 'off';
this.observerConfig = {
      attributes: true // this is to watch for attribute changes.
      ,attributeOldValue: true
  }
//set by front end only
this.was = 'off';
this.sliderObserver = '';
this.stateObserver = '';
These are set from FHEM during the initialisation of each light by the doInit() function in init.js
The last three properties are set by the front end only and are there to manage continuity of state:
- this.was is set when the master power button is set to "off". It records whether the individual light was on or off at the time. When the master power button is subsequently set to "on", this.was is used to only turn on lights that were previously on. Unless all were off, in which case all are turned on.
- this.sliderObserver and stateObserver are used to pick up changes made in FHEM, or via a physical switch then communicated by the Shelly device to FHEM, to the detailed light values (RGBW and On/Off). The FTUI3 events @value-change do not get triggered when this happens (which is a good thing). When the user is interacting with the KioskUI, FHEM can sometimes send the results too quickly, leading to circular updates. These observers are disconnected temporarily to prevent this.
Methods
These methods are used to help with managing the light
- set dim - used by the master dimmer slider to recalculate the new values for RGBW after the slider has changed value. The dimmer currently sets minimum and maximum values than can be dimmed based on the color composition of the target light. This is to help prevent a change in the colour composition that could be caused by a min->max->min dim sequence. Sometimes, change is inevitable though.
- rgbw2hex, rgb2hex and w2hex are used to convert the internal RGBW channel values to a hex value that can be transmitted to FHEM
- ideally the rgb color picker ftui component would have been used, but integrating the white channel would still be required for an RGBW light - for now the display looks more integrated across all types of light as separate channels
- template. This returns the light template used to initialise the light detail. The FTUI3 components returned are dependent on whether the light is RGBW, RGB or just a dimmer.
init.js
init.js has three distinct phases:
- Phase 1 - actions taken as the code is loaded
- Phase 2 - actions taken once the <BODY> has loaded
- Phase 3 - actions taken once the FTUI3 app has finished initializing
Phase 1 - Code Load
- Two global objects are defined
- Lights is a collection of all the light definitions
- Kiosk holds global parameters and settings
- The room is retrieved from the URL Query String
- An event listener is defined to wait for the FTUI3 app to complete initialisation
// Gloabl Objects
var lights = {}
var Kiosk = {}

// Funtion to get the Room
var getUrlParameter = function getUrlParameter(sParam) {
  var sPageURL = window.location.search.substring(1),
      sURLVariables = sPageURL.split('&'),
      sParameterName,
      i;

  for (i = 0; i < sURLVariables.length; i++) {
      sParameterName = sURLVariables[i].split('=');

      if (sParameterName[0] === sParam) {
          return sParameterName[1] === undefined ? true : decodeURIComponent(sParameterName[1]);
      }
  }
  return false;
};

// Get the CSRF token - this code is copied from the FTUI3 App
fetch("http://<your-fhem-ip>:8083/fhem?XHR=1").then(response => {
    Kiosk.ftwcsrf = response.headers.get('X-FHEM-csrfToken');
    console.log('Got csrf from FHEM:' + Kiosk.ftwcsrf);
    });

//Set the CSRF token in the Kiosk object
Kiosk.thisRoom=getUrlParameter('room')

//Watch for the FTUI3 end of initialisation event
document.addEventListener('ftuiPageInitialized',() => onFTUIReady())
Phase 2 - After the Body is loaded
Three functions
- kiosk_onLoad() is called by the browser when the body has finished loading
- This waits (up to 50 seconds) until the csrf token has been set in the Kiosk object using function isCSRFSet()
- Then it calls the doInit() function
The doInit() function fetches relevant details from FHEM (line 56) for the types of devices to be monitored that are in the room specified by Kiosk.thisRoom. This ensures only one call to FHEM for the information
function isCSRFSet(timeout) {
    var start = Date.now();
    return new Promise(checkCSRF); // set the promise object within the ensureFooIsSet object

    function checkCSRF(resolve, reject) {
        if (Kiosk && Kiosk.ftwcsrf)
            resolve(Kiosk.ftwcsrf);
        else if (timeout && (Date.now() - start) >= timeout)
            reject(new Error("timeout"));
        else
            setTimeout(checkCSRF.bind(this, resolve, reject), 30);
    }
}

function kiosk_onLoad(){
    isCSRFSet(50000).then(function(){
        doInit()
    }
    )
}

function doInit(){
    fetch(`http://192.168.1.2:8083/fhem?XHR=1&cmd=jsonlist2+room=${Kiosk.thisRoom}+TYPE+type+SHELLY+NAME+PLAYERNAME+model+scene1+scene2+scene3+scene4+state+L-white+L-red+L-green+L-blue&fwcsrf=${Kiosk.ftwcsrf}`).then(res => {
        return res.json()
      }).then((response) => {
        o=JSON.parse(JSON.stringify(response))
        console.log('res: ' + JSON.stringify(response))
        var hasPlayer=false
        var hasLighting=false
        var hasHeating=false
        var hasThermostat=false
        var lightType=""
        for (i=0;i<o.Results.length;i++){

            [... init code]
For each device returned, the doInit() code sets up the Panels required to manage them through the Kiosk UI. The code here is not in the sequence in init.js, but grouped together to show how the process fits together
Audio
Whilst looping over the Results, check whether there is a player
        // any players
        if (o.Results[i].Internals.TYPE=='SB_PLAYER'){
          hasPlayer=true
          var playerName=o.Results[i].Internals.PLAYERNAME
        }
Once all results are in, if a player was found, customise the Panel
      if (hasPlayer===true){
        var tabPrefix='Player'
        //set up the tab
        document.getElementById("Player-kiosk").src="http://<your web address>:9000/material/?single&page=now-playing&player="+playerName

        ...
        // add the active (non-clickable) tab to the Player tab row
        createPlayerTab(tabPrefix,'kiosk-tab-player-active')
Add Tabs to the other panels so that those panels can switch to the payer Panel. For instance
if (hasLighting===true){
    ...

    if (hasPlayer===true){
          createPlayerTab(tabPrefix,'kiosk-tab-player-inactive',timeout=60)
        }
Helper function to create the player tab
function createPlayerTab(view,state,timeout="0"){
    divHtml = "<ftui-column id='"+view+"-Player-Tab' class='"+state+"'><ftui-tab class='kiosk-button' timeout='"+timeout+"' view='Player-Main'><ftui-icon name='music'></ftui-icon><ftui-label>Music</ftui-label></ftui-tab></ftui-column>"
    document.getElementById(view+'-Tabs').insertAdjacentHTML('afterbegin',divHtml)
}
Heating
This works in roughly the same way, except with slightly different code.
This selects a wall mounted thermostat as the device to control, if present. Otherwise it uses the last found radiator thermostat
        // any heating
        if (o.Results[i].Internals.TYPE=='MAX'){
            hasHeating=true
            if (hasThermostat===false){
              var heatingName=o.Results[i].Internals.NAME
            }
            if (o.Results[i].Internals.type=='WallMountedThermostat'){
              hasThermostat=true
            }
        }
The Heating Panel is defined thus:
     if (hasHeating===true){
        addHeatingControl(heatingName)
The Heating code creates the full panel, rather than customising an existing one as the Audio one does. The Heating panel uses two, differently scaled FTUI-KNOB elements placed one on top of the other.
- The bottom one, scaled to use all the width and height, is the actual temperature display and is read only
- The top one, scaled to 70% of the width and height, has a transparent background, and displays the desiredTemperature. This is clickable to change the temperature. Ideally new properties of FTUI-KNOB could be included so the actual/desired temperatures can be displayed in the same way.
function addHeatingControl(heatingName){
  divHtml='<ftui-row class="kiosk-panel-row">'+
    '<ftui-knob height="100vh" width="100vw" stroke-width="15" ticks="25" style="z-index:1;position:absolute;" has-arc readonly has-scale-text has-scale color="cold-hot" [value]="'+heatingName+':temperature" max="30" min="5"></ftui-knob>' +
    '<ftui-knob height="70vh" width="70vw" stroke-width="5" style="z-index: 2;background:transparent;position:absolute;" has-needle has-value-text unit="°C" unit-offset-y="40" value-size="5em" unit-size="2em" value-decimals="1" step="0.5" [(value)]="'+heatingName+':desiredTemperature" max="30" min="5"></ftui-knob>'+
    '</ftui-row>'
    document.getElementById('Heating-Main').insertAdjacentHTML('afterbegin',divHtml)
}
The insertion of tabs uses the same tests and similar functions
function createHeatingTab(view,state,timeout="0"){
    divHtml = "<ftui-column id='"+view+"-Heating-Tab' class='"+state+"'><ftui-tab class='kiosk-button' timeout='"+timeout+"' view='Heating-Main'><ftui-icon name='fire'></ftui-icon><ftui-label>Heating</ftui-label></ftui-tab></ftui-column>"
    document.getElementById(view+'-Tabs').insertAdjacentHTML('afterbegin',divHtml)
}
Lighting
This is the most complex of the Panels to set up.
The results from the fetch are added to a new light() object and the light object added to the list of lights for the room. Note this includes: RGBW levels, the state (on/off) and the settings of each scene for this light.
Then the mutation observers for the light details are created and references saved to the light() object.
// any lights
        if (o.Results[i].Internals.TYPE=='Shelly'){
            hasLighting=true
            // most advanced defines the model
            if (lightType!='shellyrgbw'){
                lightType=o.Results[i].Attributes.model
            }
            var thisLight= new light()
            thisLight.model=o.Results[i].Attributes.model
            thisLight.name=o.Results[i].Internals.NAME
            thisLight.R=(o.Results[i].Readings['L-red'])?o.Results[i].Readings['L-red'].Value:0
            thisLight.B=(o.Results[i].Readings['L-blue'])?o.Results[i].Readings['L-blue'].Value:0
            thisLight.G=(o.Results[i].Readings['L-green'])?o.Results[i].Readings['L-green'].Value:0
            thisLight.W=(o.Results[i].Readings['L-white'])?o.Results[i].Readings['L-white'].Value:0
            thisLight.scene1=(o.Results[i].Readings.scene1)?o.Results[i].Readings.scene1.Value:'off'
            thisLight.scene2=(o.Results[i].Readings.scene2)?o.Results[i].Readings.scene2.Value:'off'
            thisLight.scene3=(o.Results[i].Readings.scene3)?o.Results[i].Readings.scene3.Value:'off'
            thisLight.scene4=(o.Results[i].Readings.scene4)?o.Results[i].Readings.scene4.Value:'off'
            thisLight.state=(o.Results[i].Readings.state)?o.Results[i].Readings.state.Value:'off'
            lights[thisLight.name] = thisLight

            let mySliderObserver = new MutationObserver( function(mutations)  {
                  mutations.forEach(function(mutation){
                    if (mutation.attributeName=='value'){
                      const [key, attribute] = mutation.target.id.split(':')
                      lights[key][attribute] = mutation.target.value
                      updateFhem("set "+key+" rgbw "+lights[key].hex );
                      setDimmerLevel()
                    }
                  }
                )
              }
            )
            lights[thisLight.name].sliderObserver = mySliderObserver

            let myStateObserver = new MutationObserver(function(mutations)  {
              mutations.forEach(function(mutation){
                if (mutation.attributeName=='value'){
                  //save approprite value
                  var key = mutation.target.id.split(':')[0]
                  lights[key].state = mutation.target.value
                  var anyOn=false
                  for (var key in lights){
                    if (lights[key].state=='on'){
                      anyOn=true
                      break;
                    }
                  }
                setPowerColor(anyOn)
                setDimmerLevel()
                }
              })
             }
            )
            lights[thisLight.name].stateObserver = myStateObserver
        }
Once the results have all been processed
- the scene colours are set on the Lighting Scenes Panel
- the individual controls for each light are added to a Lighting Details Panel (up to three lights per panel):
if (hasLighting===true){
        var tabPrefix='Lighting'
        //options first
        setSceneColors()
        //create the details panes
        for (let i=0; i < Object.keys(lights).length;i++){
          if (i%3 == 0){
            //set up a new detail tab every three tlights
            var counter=Math.floor(i/3)
            createLightingDetailsTab(counter)
          }
          createLightingDetail(counter,Object.keys(lights)[i])
        }
The individual controls are set by the light() object .template() method - this ensures the right controls are placed on the panel for the type of light
function createLightingDetail(counter,key){
  document.getElementById(`Lighting-Setting_Detail${counter}-Body`).insertAdjacentHTML('beforeend',lights[key].template())
}
The Details Tab is created and a forward reference created on the previous tab, if required:
function createLightingDetailsTab(counter){
    switch (counter){
    case 0:
        var goBack="Lighting-Scenes"
        var goForwardId = false
        break;
    default:
        var lastPanel = counter - 1;
        var goBack=`Lighting-Setting-Detail${lastPanel}`
        var goForward=`Lighting-Setting-Detail${counter}`
        var goForwardId = `Lighting-Setting-${lastPanel}-Tabs`
        break;
    }

    document.body.insertAdjacentHTML('beforeend',
    `<ftui-tab-view id="Lighting-Setting-Detail${counter}">
        <ftui-row id="Lighting-Setting_Detail${counter}-Body" class="kiosk-panel-row" style="flex-direction:column">
        </ftui-row>
        <ftui-row id="Lighting-Settings-Detail${counter}-Tabs" class="kiosk-tab-row" >
        <ftui-row id="Lighting-Setting-${counter}-Tabs" class="kiosk-tab-row" >
        <ftui-column id="Lighting-Setting-${counter}-Back-Tab" class="kiosk-tab-active-back">
            <ftui-tab class='kiosk-button' view="${goBack}" timeout="60">
                <ftui-icon name='long-arrow-left'></ftui-icon>
                <ftui-label>Back</ftui-label>
            </ftui-tab>
            </ftui-column>
        </ftui-row>
    </ftui-tab-view>`
    )
    if (goForward){
    document.getElementById(goForwardId).insertAdjacentHTML('beforeend',
    `<ftui-column id="Lighting-Setting-${lastPanel}-Forward-Tab" class="kiosk-tab-inactive">
            <ftui-tab class='kiosk-button' view="${goForward}" timeout="60">
                <ftui-icon name='long-arrow-right'></ftui-icon>
                <ftui-label>Next page</ftui-label>
            </ftui-tab>
            </ftui-column>`
    )
    }
}
After this, tab references similar to Audio and Heating are added.
Phase 3 - After FTUI is initialised
Some actions can only be performed once FTUI is ready to process them. One of these appears to be changing the header color on an FTUI-GRID, so it has to wait until after the FTUI event 'ftuiPageInitialized' has been dispatched.
If the current light setting matches the same scene setting for all lights in the room, the scene header is set to "success" to indicate it is currently selected. If not, no action is taken
function onFTUIReady(){
    console.log("My FTUI Ready")
    //for each scene in each light, confirm that the current light setting matches the same scene (if any)
    var matchScene=false
    for (key in lights){
        if (matchScene==-1){
            break;
        }
        var scenes=[lights[key].scene1,lights[key].scene2,lights[key].scene3,lights[key].scene4]
        if (!matchScene){
            matchScene = scenes.indexOf(lights[key].hex)
        }
        else {
            matchScene = scenes[matchScene].indexOf(lights[key].hex)
        }
    }
    scene_to_select = ['scene1','scene2','scene3','scene4'][matchScene]
    switch (scene_to_select){
        case '':
            break;
        case undefined:
            break;
        default:
            document.getElementById(scene_to_select+'_header').color='success'

    }
}
light_functions_js
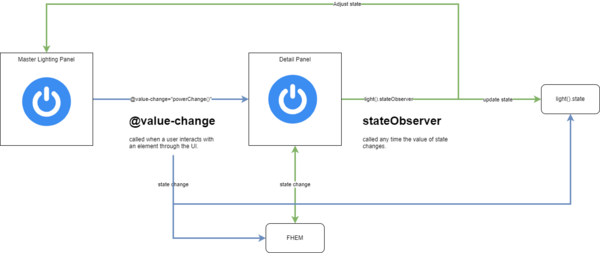
The light functions work together to make sure the UI reflects FHEM consistently and vice versa. The principle of how it works is described in this diagram for state changes:
- If the master power button is clicked in the UI, the change is propagated to the detail tab for all lights.
- The change is also sent directly to FHEM and updated in the relevant light() objects
- If the state is changed in FHEM, this is sent to the Lighting Detail Panel, observed by the state mutation observer and the light() object updated
- The change is also reflected in the master Lighting Panel if required
- This does not result in a cycle, as the @value-change event is not triggered for a state change programatically applied - only for an event in the UI
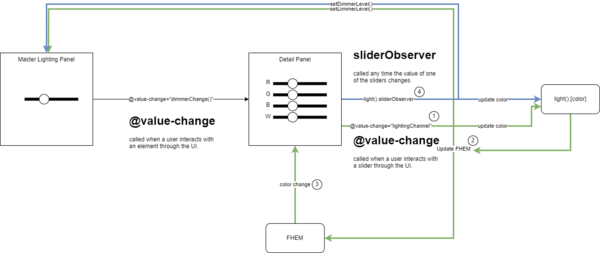
However, for the light channels on the Lighting Detail Panel, things get more complicated as the value selected by the user cannot be sent directly to FHEM, but first has to be set in the light object so the hex rgbw value can be calculated:
- The user changes a slider. @value-change changes the light() value for that channel.
- ... and then sends the new light().hex value to FHEM and sets the master dimmer level
- FHEM sends the new light value to the Lighting Detail Panel
- the sliderObserver also changes the light() object and sets the master dimmer level
$$ NEED TO CONFIRM AND EXPLORE THE ANTI-CYCLING LOGIC $$
These light functions are used to set the individual light settings when the master power and dimmer slider are changed:
- powerChange - changes all "on" lights to "off" and vice versa
- dimmerChange - changes the values of ALL light channels in proportion to the change to the dimmer
These functions are used to reflect changes to the individual lights in the master power and slider
- setPowerColor - sets the power color to be "off" if all lights are off, or "on" if any on
- setDimmerLevel - set the slider position to the max of all light channels for all "on" lights or the max of all lights channels for all lights if they are all off.
Kiosk CSS
Improvements required
- The Heating Thermostat scales well for square displays, but other aspect ratios are not handled well.
- There is code duplication between this implementation and the FTUI3 App. This should be eliminated.
- The hard-coded timeouts should be <META> driven.
- Control of further devices, using the same principles should be possible.

